Product walkthrough · v1.0
Qatom walkthrough guide
Every step a person takes on Qatom: buyers in AI chat, sellers in the Qatom Dashboard, owners in the Qatom Console. Open any step for what it is for, how to do it, what you will see and what to watch for.
Qatom does more than the steps shown here: a twin can hold any asset or currency, and Qatom is modular, so builders pick which parts Qatom handles.
- 106 steps
- Buyer 30
- Seller 39
- Console 32
- Shared 5
- 29 move money or need a secret
- 14 still to confirm
Start here
- Buying with your AI?Follow A1 to A17: connect, fund your agent, buy, approve and get your receipt.
- Selling on Qatom?Follow B1 to B21: build your endpoint, register, create items, test them and announce.
- Collecting your money?Follow C1 to C27: find your payments, distribute them and cash out.
Tip: set up a passkey first (S11). Every sign-in and approval then takes one tap.
Step numbers are permanent labels you can link to, not reading order. Read each journey top to bottom.
01 · In AI chat · 30 steps
Buyer
A buyer is a person, or their agent, who finds and pays for catalog items from Claude, Grok, Muse or any MCP client.
A1 Connect your AI to the whole Qatom catalogAdd the Qatom master MCP as a custom connector (Claude, Grok, Muse, any MCP client)
The master MCP is the one connection a buyer needs. It gives your AI every public catalog item plus the wallet tools.
How
- In Claude, open Customize → Connectors → Add → Add custom connector.
- Name it Qatom, enter the URL
https://mcp.m.todaq.net/mcpand click Continue. - Leave the detected settings as they are (Authentication: Sign in now; OAuth client: Register automatically) and click Add.
- Click Connect; Qatom's sign-in page opens (A2).
- In Muse, ask in chat: "I'd like to connect to the Qatom MCP at
https://mcp.m.todaq.net/mcp". Muse shows it as a "Todaq" connector card: click Connect, read Meta's custom-connector notice, click Connect again and continue to Qatom's sign-in page. - In Grok, use grok.com/connectors → Custom with the same URL. In any other MCP client, add the same URL as a remote MCP server.
What you’ll see
Qatom appears in your client's connector list and its tools, such as catalog_search, become available.
Watch for
- Use the master MCP URL for buying; a seller's own instance URL is a different connection (A22).
Walk-through
A2 Sign in once with an email code or passkeySign in to Qatom (email code or passkey) and approve the connector's access
Signing in links your AI client to your Qatom wallets. Sign-in and registration are the same flow; a new email creates a wallet.
How
- On "Sign in with Qatom", enter your email and click Continue. If you already have a Qatom wallet, use the email connected to it; any other email creates a new wallet.
- On "Verify your identity", enter the 6-digit code sent to your email, or use Sign in with a passkey next time.
- The first time, Qatom offers "Sign in faster": click Set up a passkey (recommended, S11), or Not now.
- Next it offers "Add funds to your wallet" (A7). Top up now, or click Skip for now.
- Back in your client, Qatom shows as connected.
What you’ll see
"Connected to Qatom" in your client, with Qatom's tools listed (in Claude: under Tool permissions).
Watch for
- Set up a passkey first (S11): every sign-in and approval page then takes one tap instead of an emailed code.
- Use the same email every time. A different email creates a new, empty account and wallets, and money in your old wallet won't show.
- If you already have a Qatom wallet, use the email connected to it.
- An
invalid_granterror is a server-side problem; don't keep re-authorising in a loop.
Walk-through
A3 Get your own wallet and your agent's walletFirst sign-in creates the account, primary twin and agent twin
The first sign-in sets up two wallets. Qatom calls each wallet a twin: a small secure app that holds your money as USD-TDN, a US-dollar token (the Qatom Console shows it as TDN; it is the same unit). Your primary wallet (primary twin) is yours; your agent wallet (agent twin) is what your AI spends from.
How
- Complete the first sign-in (A2).
- Ask your agent: "Check my Qatom agent wallet." It calls
agent_wallet_info. - Note your primary wallet (yours, protected by sign-in) and your agent wallet (what your agent spends).
What you’ll see
agent_wallet_info lists your primary wallet and your agent wallet with their USD-TDN balances.
Watch for
- The agent can never spend more than its twin holds, and never touches your primary wallet or card.
- Plans are for sellers only; buying never needs a plan.
- The first time your agent uses a Qatom tool, Claude asks: Deny, Always allow or Allow once. Always allow on the read-only tools (such as Agent wallet info) saves a click every time; keep paying tools on approval.
Walk-through
A4 Let your agent work on your seller accountOpen your seller account to your AI chat (choose the account the connection may use)
If your login owns a Qatom seller account, your agent can read it and, with your approval, change it from chat. First you choose which seller account it may use. This is a separate yes from connecting Qatom: until you choose, the account tools answer that no account is chosen.
How
- Ask your agent to use your Qatom seller account; it calls
account_chooseand gives you a link (it works once and expires in 15 minutes). - Sign in with your passkey, or your email and the code sent to it, using the email the agent is connected with.
- The page says which app is asking (for example "an app that calls itself Claude"), what the agent will see (catalog, wallets, MCP server and plan), and which account it uses now. Pick the account and click Use this account.
- When it says "Done. The agent now uses <account>", go back to the chat. To switch later, ask the agent to choose again.
What you’ll see
The agent can now read the account: its plan and billing, wallets, catalog, sales and MCP server.
Watch for
- Choosing an account lets the agent read it; every change still asks for your approval (B23).
- Only seller accounts your login owns are offered. A login with no seller account doesn't get the account tools at all.
- Check which account you chose before you fund or approve anything; purchase approvals don't name the paying wallet (A31).
A5 Check what your agent can spendSee your wallets and balances (primary and agent twin)
Your agent twin's balance is its hard spending ceiling. Checking it before buying avoids failed purchases and surprises.
How
- Ask: "Check my Qatom wallets." The agent calls
agent_wallet_infoand lists your primary and agent wallets. - If you also sell on Qatom, ask for your business account's wallets; the agent calls
account_wallets. - Read each wallet's name and USD-TDN balance.
What you’ll see
The agent lists each wallet with its USD-TDN balance.
Watch for
- Balance reads can lag a purchase by a few minutes; read again before concluding anything.
- The account_ tools (
account_choose,account_wallets,account_dashboard_linkand the rest) are listed on some connections and not others, and they work only once a business account is chosen. To confirm Which connections list them.
A6 Give each wallet a name you recogniseRename a wallet
Clear wallet names make it easier to know which wallet you fund and approve for, especially with several wallets.
How
- Ask your agent to list your wallets (A5).
- Ask it to rename one, giving the wallet and the new name; it calls
account_rename_wallet. - List the wallets again to check the new name.
What you’ll see
The wallet list shows the new name.
Watch for
- You can also rename a twin in the Qatom Dashboard under Twins → twin → Name → Save name.
- The account_ tools (
account_choose,account_wallets,account_dashboard_linkand the rest) are listed on some connections and not others, and they work only once a business account is chosen. To confirm Which connections list them.
A7 Add funds to your wallet by cardTop up the primary wallet by card MoneyTo confirm
Your primary wallet holds the money you then hand to your agent. A card top-up is one way to fund it.
How
- Ask your agent to fund your primary wallet; it calls
fund_primary_wallet. - Open the card page it returns.
- Complete the card page yourself and pay.
- Check the primary wallet's balance (A5).
What you’ll see
The primary wallet's USD-TDN balance goes up once the card payment completes.
Watch for
- Right after your first sign-in, Qatom offers "Add funds to your wallet": 5, 10, 20 or 50 US dollars, by Apple Pay or card. "Load funds to agentic wallet" is ticked, so the money goes straight to your agent wallet, with no separate transfer (A8). Untick it to keep it in your primary wallet.
- Your agent never sees or uses your card; you complete the page yourself.
- If the card page returns an error on a new wallet, fund it another way (A32).
- Card top-ups carry card fees. To confirm Whether the fee is added to the charge or taken from the amount.
A8 Give your agent a small spending budgetMove funds from primary to the agent twin Money
Your agent can only spend what its own twin holds. Moving a small amount sets a hard limit on what it can buy.
How
- Ask your agent to move an amount from your primary wallet to your agent wallet; it calls
transfer_to_agent. - It gives you an approval link and a push to your TODAQ app (Qatom Authenticator). Check the account, wallet and amount (A31), then approve.
- Tell the agent you have approved; it calls again with the approval id to finish. Nothing moves until it does.
- Check the agent wallet's balance with
agent_wallet_info.
What you’ll see
The agent twin's balance rises by the amount moved, and the primary falls by the same.
Watch for
- Fund the agent like handing over a little cash; it can't reach your primary wallet.
A9 Let small purchases go through without askingSet the auto-approve limit for agent purchases To confirm
Purchases at or under your auto-approve limit settle without asking you. Above it, you approve each one.
How
- Start any agent purchase that asks for approval.
- In the checkout approval modal, set your auto-approve limit in USD-TDN.
- Set it to 0 if you want to approve every purchase.
- Set the limit in the modal, then approve or decline the purchase in front of you. To confirm The exact control names.
What you’ll see
The next purchase at or under the limit completes without an approval prompt.
Watch for
- Set the limit with retries in mind: auto-approve also lets a retried call through, so a retry can charge twice (A28).
- Only you can change the limit; an agent's token is refused.
- The limit covers carts too: a cart whose total is within it is paid at once, with no approval.
A10 Find what your agent needs in the catalogSearch the catalog by need or name
Search is how an agent finds items to buy. It returns every public item that matches, with price and seller.
How
- Ask in plain words: "Search the Qatom catalog for weather."
- The agent calls
catalog_searchwith your query. - Ask it to narrow or page through results if there are many.
What you’ll see
A list of items, each with id, name, description, price, seller and input schema.
Watch for
- An item with no seller line (or seller None) comes from a seller who hasn't set a business name, so you can't tell whose item it is.
- The catalog also holds test listings; check the seller and description before paying.
- Private items don't appear in master search; they are only on the seller's own instance (A22).
Example
Search for "Qatom Demo" to find the demo store's feedback, seller guide skill and space station video items.
A11 Know what you get before you payRead an item: price, seller, inputs, description, read-me
The listing and the seller's read-me say what an item returns, what it costs and which inputs it takes.
How
- Ask your agent to show one item from the search results.
- Check the price in USD-TDN, the seller name and the inputs in the schema.
- Open the llms.txt link in the description for examples and error meanings.
- Look for a free check or preview item beside a paid one.
What you’ll see
Your agent explains the item's price, seller, inputs and what it returns.
Watch for
- Prices show up to three decimals; the smallest paid price is 0.001 USD-TDN. Qatom's own tool results and receipts always show three decimals, so a free item shows as 0.000 and 2 shows as 2.000.
Example
The Qatom Demo store serves its read-me at https://qatom-demo.agentkepler.tech/llms.txt, listing each item, its price and inputs.
A12 Use free items at no costCall a free item
Free items cost 0 and return their answer in the receipt. Sellers use them for checks, previews and feedback.
How
- Find a free item with
catalog_search. - Ask your agent to call it; it uses
agent_checkoutwith the item id and arguments. - Read the answer inside the receipt.
What you’ll see
A receipt for 0 USD-TDN with the seller's answer inside.
Watch for
- A free item can still ask you to approve before it runs. Approving moves no money; this step will be simplified.
Example
Qatom Demo: customer feedback is free and returns a reference id. Centaur League's search challenges, spectate and leaderboard are free too.
A13 Let your agent buy and use an itemBuy a paid item from the agent twin Money
agent_checkout pays from the agent twin and returns the seller's answer in the same step. Your agent asks you before paying.
How
- Pick the item and inputs (A10, A11).
- Ask your agent to buy it; it confirms the price with you first.
- The agent calls
agent_checkoutwith the item id and arguments. - Within your auto-approve limit it settles at once. Above it, the agent gives you an approval link and waits; approve, tell the agent, and it calls again to finish (A14).
What you’ll see
A receipt with a transaction id and the seller's answer, and a lower agent twin balance.
Watch for
- "Invalid payment request" can mean the seller's endpoint rejected the call; check your wallet history (A28) to see whether you were charged, then ask the seller (A27).
- The agent wallet's balance is a hard ceiling; top it up first if needed (A8).
- To buy several items at once, use a cart (A33).
Example
Buying Qatom Demo: seller guide skill (0.005 USD-TDN) returns a 15-minute download link, version, SHA-256 and install steps.
Walk-through
A14 Say yes before larger purchases settleApprove a purchase above the auto-approve limit Money
Above your auto-approve limit, nothing is paid until you approve. This keeps you in control of every larger purchase.
How
- When your agent asks, open the approval link it gives you, or the push on your phone in the TODAQ app (Qatom Authenticator).
- Check you are signed in to the account you mean to pay from (A4), then check the item, the seller it pays and the amount (A31).
- Tap Approve, or Dismiss to decline.
- Tell the agent you have approved. It calls again with the approval id and shows the receipt; nothing happens until you tell it.
What you’ll see
The approval page confirms your decision and the agent shows the receipt, or reports the decline.
Watch for
- Approval links expire after about 15 minutes and belong to one account. If one expires, ask the agent to start the purchase again; the old approval can't be used.
A15 Keep the transaction id for every purchaseRead the result and the receipt (transaction id)
The receipt holds what you bought and the seller's answer. Its transaction id is what you quote in any refund request.
How
- Ask your agent to show the full receipt.
- Note the transaction id, item, amount and the seller's answer.
- Keep the transaction id somewhere safe.
What you’ll see
A receipt showing the transaction id, item, amount paid and the seller's response.
Watch for
- The receipt line comes from the seller's descriptor, which can differ from the item name.
Example
Qatom Demo receipts carry a one-line summary and a display link, such as "Watch the stream" for the video item.
A16 Pay by card without setting up a walletBuy as a guest by card, no wallet MoneyTo confirm
Guest checkout lets a person pay for one item by card. It suits single purchases where no wallet exists.
How
- Give your agent the item's inputs; it collects them in chat, then calls
guest_checkoutfor a checkout link. - Open the checkout page, then enter and verify your email to receive a secure receipt with proof of purchase.
- Enter your card details yourself and pay.
What you’ll see
The checkout page confirms payment. To confirm Where the item's result is delivered.
Watch for
- Card payments have a minimum of about $0.50, so small items suit agent wallets instead.
A33 Gather several items into one cartPut several items in one cart and change it before paying
A cart holds several items, from one seller or several, so you pay once. You can change quantities and inputs, or take items out, until paying starts.
How
- Ask in plain words for the items you want, for example "Get me the space station video and two copies of the seller guide skill."
- Answer the agent's questions for each item's inputs; it adds each one with
cart_add_item(up to 20 of an item). - Ask to see the cart; the agent calls
cart_viewand shows each line, its quantity, price and the total. - Change your mind freely: the agent uses
cart_update_itemfor a quantity or inputs, andcart_remove_itemto take a line out.
What you’ll see
A cart summary listing each item, its quantity and price, and the total in USD-TDN.
Watch for
- Each copy of an item is a separate purchase with its own transaction id.
- Line numbers carry on across carts, so the agent should look at the cart (
cart_view) before changing a line. - To drop the whole cart, ask the agent to discard it (
cart_discard); a cart someone has started paying can't be discarded.
Example
On 12 Oct a cart held Qatom Demo: customer feedback (free), the seller guide skill (0.005) and the space station video (0.01, with a two-hour link): total 0.015.
A34 Pay for the whole cart at oncePay for a cart: from the agent wallet with one approval, or by card at one link Money
A cart is paid in one go: from your agent wallet with a single approval for everything, or by card at one checkout link. Each item is then delivered to its seller with its inputs.
How
- Choose how to pay. Agent wallet: the agent calls
cart_pay. Card: the agent callscart_checkoutand gives you one link for everything. - Agent wallet within your auto-approve limit: it is paid at once. Above the limit: approve the whole cart once (A14, A31), tell the agent, and it calls
cart_payagain with the approval id. - Card: open the link, check the items and total, and pay yourself. The cart can still be changed until paying starts, and the link shows the change.
- Read each item's answer in the agent's reply: links, files or confirmations.
What you’ll see
The agent shows every item's result (for example a stream link, a download link and a feedback reference) and one receipt email lists every item and the total.
Watch for
- Each item's answer comes back once, in that reply. Ask the agent to pass on every link straight away; asking again won't bring it back.
- If a price changes after you approve, nothing more is charged and you are asked again.
- A long cart may take more than one call; the agent carries on with the same approval.
- To stop partway, ask the agent to finish the cart (
cart_finish): you keep what was bought, the rest is cancelled, and you get a receipt. - The receipt email shows the cart's id; each item's own transaction id is in the agent's reply.
Example
Paid 0.015 from the agent wallet on 12 Oct, within a 1 USD-TDN auto-approve limit, so no approval: the feedback reference, a 15-minute skill download and a two-hour stream link came back in one reply.
Walk-through
A17 Keep an emailed proof of every purchaseReceive the emailed receipt with proof of purchase
Every direct purchase, by agent or by guest card checkout, sends an emailed receipt. It gives you a record outside the chat for bookkeeping and refund requests.
How
- Check your inbox after a purchase.
- Open the Qatom receipt email.
- Keep it with the transaction id from the chat receipt.
What you’ll see
A receipt email with the purchase details.
A22 Reach a seller's private and featured itemsConnect a seller's own MCP instance (private and featured items) To confirm
Each seller has its own MCP instance. Private items are only reachable there, and featured items appear as named tools.
How
- Get the seller's MCP URL from the seller, for example from their website or llms.txt; it ends in .mcp.m.todaq.net/mcp unless they use their own domain.
- Add it as a custom connector in your client, as in A1.
- Sign in if asked (email code or passkey, as in A2).
- List the tools to see the seller's featured items.
What you’ll see
The seller's featured items show up as named tools in your client.
Watch for
- Private items aren't in master search, and
agent_checkoutthrough the master MCP says they are not found. - To confirm Whether buyers sign in to a seller's instance the same way as the master MCP.
A23 Act on a live board inside the chatUse an interactive MCP App view (board, card, player)
Some sellers attach a live view to free tools, so you get a board, card or player in the chat. Money stays on Qatom.
How
- Add the seller's free MCP server as a second custom connector, e.g.
https://centaurleague.games/mcp(no sign-in). - Ask for a view, for example "Spectate Centaur League" or view a match.
- Use the view: drag pieces, offer a draw or resign on the board.
- Keep paid steps, such as entry, on the Qatom MCP.
What you’ll see
An interactive board or card opens inside the conversation.
Watch for
- MCP Apps (boards, cards, players inside the chat) work in Claude, ChatGPT and Hermes today. Grok and Muse don't support them yet.
- No purchase starts from inside a view; you approve money in Qatom's own flow.
Example
Centaur League's view_match and spectate open a chess board in the chat; the agent recommends a move and the human plays it.
A24 Open your stream link and watchWatch a purchased video stream
A video purchase returns a player link with its own time-limited key. You watch in the browser until the key expires.
How
- Buy the video item (A13); you can set
ttl_secondsfor how long the key lasts. - Open the player link from the receipt (shown as "Watch the stream").
- Let the player pick the quality; it adapts between 1080p, 720p and 480p.
What you’ll see
The video plays in the browser player, with the poster shown first.
Watch for
- The key is per purchase: anyone with the link can watch until it expires.
- An expired or altered link answers 403; buy again to watch after expiry.
Example
Qatom Demo: space station video (0.01 USD-TDN) plays a NASA public-domain fly-through; ttl_seconds runs 60 to 86400, default 3600.
A25 Tell a seller what worked or didn'tSend feedback to a seller
Sellers add a free customer-feedback item by default. It is the direct way to reach the seller.
How
- Search the catalog for the seller's "customer feedback" item.
- Ask your agent to send your message with
agent_checkout; it is free. - Add your email to get a reply, and an order or item id if it is about one purchase.
- Keep the reference id it returns.
What you’ll see
A 0 receipt with a reference id confirming the seller received your message.
Watch for
- Messages are 3 to 2,000 characters.
- A
not_configured(503) answer means the seller hasn't set up feedback yet; use the next step in A27.
Example
Qatom Demo: customer feedback takes message (required), from_email and subject_ref, and returns a reference id.
A26 Jump from chat to the web dashboardOpen the Qatom web dashboard from chat To confirm
Some tasks are done only on the web: secrets, API keys, an item's request headers, your card, your plan, a custom domain. The agent hands you a link to the right Qatom Dashboard page.
How
- Ask your agent for the page you need; it calls
account_dashboard_linkwith that page (for an item's headers, with the item id). - Open the link in your browser and sign in if asked.
- Check the Dashboard shows the account you meant before changing anything.
What you’ll see
The Qatom Dashboard opens on your account at dashboard.qatom.ai.
Watch for
- Never paste a secret, key or card number into the chat; the link exists so you enter them on the Dashboard yourself.
- The Dashboard opens the account you last used there, which may not be the one you asked about.
- The account_ tools (
account_choose,account_wallets,account_dashboard_linkand the rest) are listed on some connections and not others, and they work only once a business account is chosen. To confirm Which connections list them.
A27 Ask the seller first, then TODAQ supportAsk for a refund or report a billing problem
Payments settle immediately, and refunds are the seller's decision. This path gets your request to the right person.
How
- Copy the transaction id from the agent's reply, the receipt or your wallet history.
- Call the seller's free customer-feedback item with the transaction id and what went wrong.
- If the seller has none, or there is no reply in a day or two, email support@todaq.net with the transaction id, the item and what happened.
- Watch your wallet for a refund transfer.
What you’ll see
A reference id from the feedback item; any refund arrives as a transfer to the wallet that paid.
Watch for
- No refund timelines are promised.
- For an item bought in a cart, quote that item's own transaction id from the agent's reply; the receipt email shows the cart's id.
- A free Team Kepler feedback item is coming (S10); until it is in the catalog, use support@todaq.net.
Example
Qatom Demo: customer feedback takes subject_ref, where you put the transaction id.
A28 Check before you retry a paid callRetry safely: check the receipt and wallet before retrying a paid call; a retry is a new charge, even under auto-approve Money
If output is cut off, the purchase may still have gone through. A retry is a new charge, so check first.
How
- Ask the agent for the last receipt and its transaction id.
- Read the agent twin's balance, allowing a few minutes for it to update.
- Retry only if there is no receipt and the balance hasn't dropped.
- If you were charged twice, follow A27.
What you’ll see
One receipt per purchase you intended, and a balance that matches.
Watch for
- Auto-approve lets a retry through without asking, so double charges happen silently.
- A call the seller rejects can still be charged.
A29 See how a seller's listings rateCheck a seller's rating before buying (when Pirate Kepler's ratings are live) To confirm
A rating service scores catalog listings so buyers can judge a seller before paying.
How
- Search the catalog for the ratings and reviews tool.
- Ask your agent to look up the seller's rating.
- Read the score alongside the item's listing.
What you’ll see
The seller's rating shows next to the item.
Watch for
- To confirm Pirate Kepler's ratings are launching; the tool's name and what it returns are to be confirmed.
A30 Approve purchases from your phoneInstall the TODAQ app (Qatom Authenticator) and sign in to the right twin Secret
The TODAQ app (Qatom Authenticator) lets you approve agent purchases on your phone. It must be signed in to the account that pays.
How
- Install the TODAQ app (Qatom Authenticator) on your phone.
- Sign in with the same account you use in chat.
- Check it shows the wallet you approve purchases for (A31).
What you’ll see
The app shows your account and wallet, ready for approvals.
A31 Check the item, seller and price before approvingCheck what you are approving: item, seller, quantity and price Money
With several accounts or wallets, approving the wrong one spends the wrong money. A quick check prevents that.
How
- Open the Purchase Approval request (the web page, or the TODAQ app, also called Qatom Authenticator).
- Read the item name, "Payment to" the seller, the quantity and the price.
- If anything is wrong, tap Dismiss.
- Approve only when all of it matches what you asked for.
What you’ll see
Purchase Approval shows Purchase Request, the item with "Payment to <seller>", Qty and the price, with Dismiss and Approve.
Watch for
- The approval doesn't name the paying wallet, so make sure you are signed in to the account you meant to pay from (A4).
- For a cart, one approval covers every item at the prices shown; check the total and the item list.
A32 Get first funds into a new walletFund a brand-new wallet (card top-up, or a transfer from another twin) Money
A new wallet starts empty. You can fund it by card, or send USD-TDN to it from a twin you already hold.
How
- Try a card top-up first with
fund_primary_wallet(A7). - Or, in the Qatom Console at console.todaq.net, open a funded twin and click Send.
- Pick the currency, enter the amount and the new wallet's twin URL, add a memo, and let the owner click Transfer.
- Or request TDN with Purchase TDN → Buy TDN and pay by wire or ACH.
What you’ll see
The new wallet's balance shows the USD-TDN received.
Watch for
- Some new wallets have returned an error (500) on card top-up; use a transfer instead.
- Send needs the Transfer role on the sending twin; never retry a transfer that was accepted.
- Buy TDN requests run from 0.50 to 100 USD and are filled once your payment lands.
02 · In the Qatom Dashboard · 39 steps
Seller
A seller turns an API, dataset, stream or game into catalog items that agents can find and pay for, using the Qatom Dashboard. The steps run in the order a new seller meets them.
B1 Choose one thing agents will pay forPick the first use case and price
Start with one item that answers in one call and is cheap to serve. A small, clear first item is easier to test, price and explain.
How
- Install the seller guide skill in your agent: npx skills add StarwaterHeaven/qatom-seller-guide --skill qatom-seller-guide.
- Answer its questions: what you have that is computed, current, unique or tedious, and who would ask for it many times.
- Say what one answer costs you to produce.
- Pick one or two first items from the use-case library, each with a free sibling check.
- Set a price per call in USD-TDN: 0 for free, otherwise at least 0.001, with no more than three decimals.
What you’ll see
The guide gives one line per chosen item: what it returns, who buys it, and a price idea.
Watch for
- One catalog item has one price; several prices means several items.
- Guest card checkout has a minimum of about $0.50, so sub-50-cent items suit agent wallets.
- You can register (B34) before or after building; the guide builds first so your endpoint is ready when you create items.
Example
The Qatom Demo store sells a video at 0.01 and an agent skill at 0.005, beside a free feedback item.
B2 Put your product behind one HTTPS endpointBuild and host the endpoint (Worker template)
Qatom calls your endpoint after each payment settles. You host it; the Worker template is the fastest start.
How
- Start from the Worker template: it reads one catalog.json, validates inputs, guards the paid route, serves /llms.txt and runs the feedback item.
- Give each item one permanent lowercase ID, named inputs with types and ranges, and a one-sentence summary in every response.
- Return every error with a code, a plain message and a next step (for example
unknown_parameter400,bad_value400). - Deploy it to your host and call it directly to test, before testing through Qatom.
What you’ll see
A direct call to a free route returns JSON with ok: true and a readable summary.
Watch for
- Never accept raw SQL, code or query strings as inputs; turn them into named inputs.
- Qatom may relay a failed call as a generic payment error, so test the endpoint directly first.
- Keep secrets out of the endpoint URL; other dashboard users can see it.
Example
The Qatom Demo store is one Cloudflare Worker behind three catalog items; its base URL https://qatom-demo.agentkepler.tech returns the store name and read-me link.
B3 Make the paid route answer only QatomSet the endpoint's secrets (secret path, fulfilment token) Secret
The paid route must refuse any call that did not come from Qatom. A fulfilment token, checked on every call, does that.
How
- Generate the token on your own machine: openssl rand -hex 24.
- Store it in your host's secret store (wrangler secret put QATOM_FULFILMENT_TOKEN) and in a password manager.
- Have the endpoint check the Authorization header with a constant-time compare and answer 404 when it is missing or wrong.
- Optionally add a secret path (/paid/<SERVICE_PATH>/...) for extra depth; other paths answer 404.
What you’ll see
A direct call without the header gets 404; the same call with the header gets the answer.
Watch for
- Never paste a secret into chat, docs, tickets or a listing.
- A secret path sits in the endpoint URL, which other dashboard users can see; the header is the main guard.
- Never echo the request URL or headers back in a response; rotate anything that leaks.
Example
The Qatom Demo store's paid routes need both a secret path and a Sensitive Authorization header that Qatom sends on every fulfilment call.
B4 Tell agents how to call and pay youWrite and serve the agent read-me (llms.txt)
llms.txt is a Markdown read-me for language models at your site root. Agents that find your items look for it before calling.
How
- Generate it from catalog.json, or from the live public catalog (GET
https://pay.m.todaq.net/v4/catalog/items); never write it by hand. - Include: seller name, a short summary, a Generated timestamp, how to call (
catalog_searchthenagent_checkout), worked examples and the catalog table. - Add the input schemas, every error code with its next step, and resources including your feedback item.
- Serve it at /llms.txt on your own domain and put that URL in every item description.
What you’ll see
Opening /llms.txt on your site shows the generated timestamp and a table of your items with prices.
Watch for
- Regenerate it on every catalog change so it never drifts from what is listed.
Example
The Qatom Demo store generates https://qatom-demo.agentkepler.tech/llms.txt itself; Centaur League regenerates its read-me every 10 minutes from the live catalog.
B34 Create your seller account and MCP serverRegister a new seller account: email code, Organisation, Billing (plan), Start my MCP server
Registering creates your account, its wallets and your own MCP server. It is the same flow as signing in.
How
- Go to dashboard.qatom.ai and choose New? Register an account.
- Enter your email, click Continue and enter the emailed code, or Sign in with a passkey.
- Step 1, Organisation: Business name, Display name, Billing email, optional address and tax number, then Next.
- Step 2, Billing: choose a plan (Builder, Pro, Max or Enterprise), then Start my MCP server.
What you’ll see
You land on the Dashboard Overview with your account name, plan badge and tiles for 1 MCP instance and 0 items.
Watch for
- Set up a passkey first (S11): every sign-in and approval page then takes one tap instead of an emailed code.
- The new server takes a few minutes to become healthy; the banner can say Running before MCP → Overview shows healthy.
- If the email already has a Qatom wallet, it connects to that wallet.
- The plan list may still show an older name for Max ($300/mo).
Example
The Qatom Demo account was registered this way on the Builder plan on 11 Oct 2026.
B5 Come back to your seller dashboardSign in again later
After registering (B34), you sign in the same way each time to manage items, your MCP server and settings.
How
- Open dashboard.qatom.ai and click Sign in.
- Enter your email and click Continue, then enter the emailed code; or Sign in with a passkey.
- Wait for the Overview page to load.
What you’ll see
The Overview shows your account name, plan badge, MCP status and tiles for MCP instances, catalog items and revenue.
Watch for
- Set up a passkey first (S11): every sign-in and approval page then takes one tap instead of an emailed code.
- Use the email you registered with; a different email creates a new wallet and account.
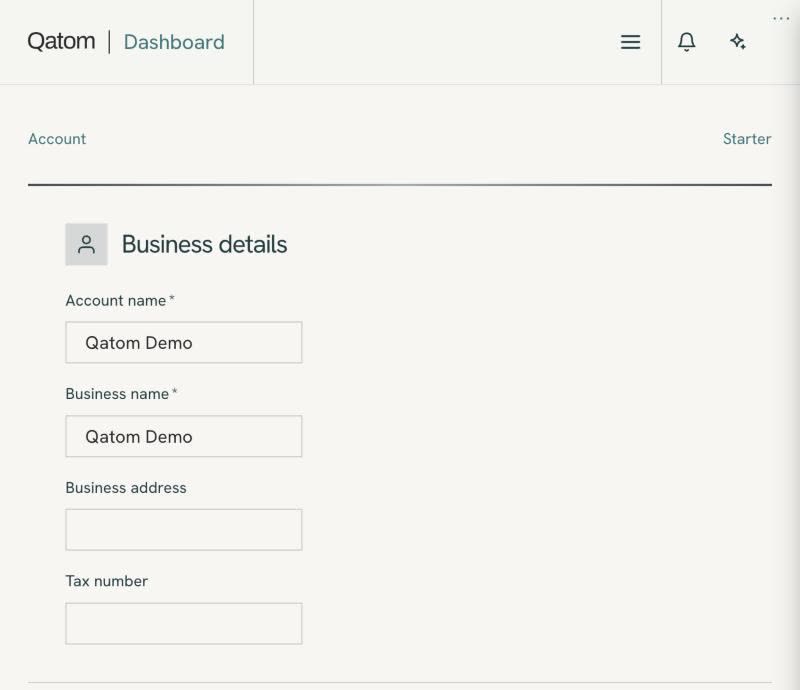
B7 Set the seller name buyers seeSet the business details and verify the billing email (the business name is the seller name buyers see)
Your business name is the seller name on every item. Without it, search shows the seller as "None" and agents cannot tell whose item it is.
How
- Open Account (/dashboard/account).
- Fill in Account name and Business name; add Business address and Tax number if you want.
- Enter the Billing email and click Send verification email, then follow the email.
- Click Save changes, before you publish any item.
- From chat (after A4): ask your agent to change the business name; it calls
account_update_detailsand you approve the change (B23).
What you’ll see
catalog_search shows your business name as the seller instead of "None".
Watch for
- Set it before publishing; items from a seller with no business name show seller None.
- Delete this account on the same page is irreversible.
Walk-through
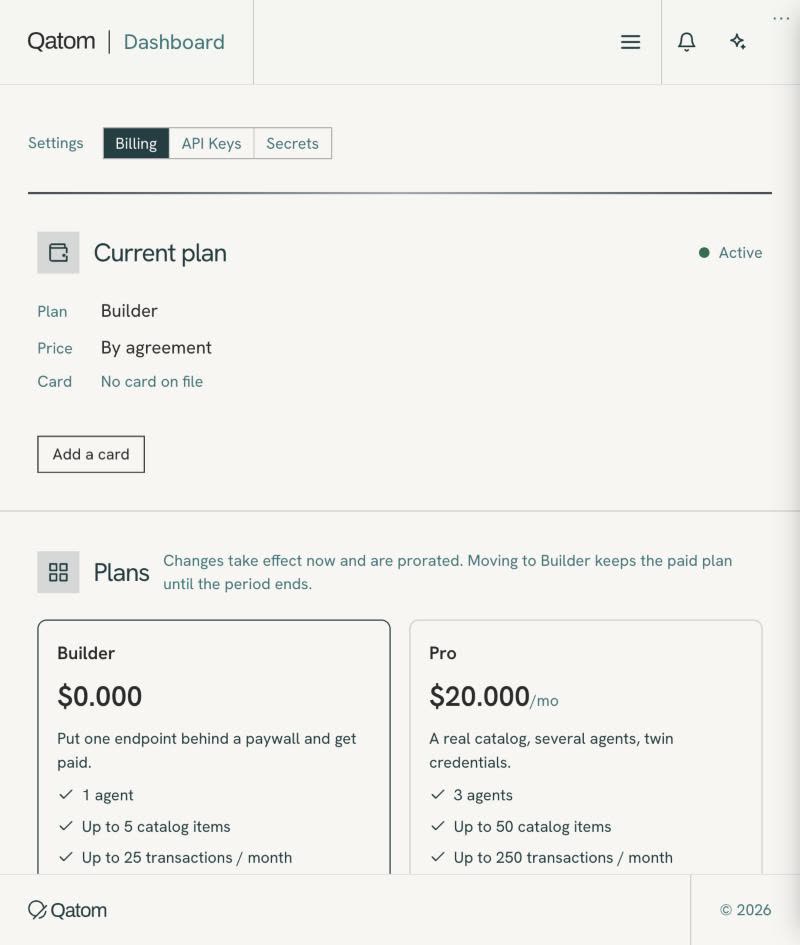
B8 Choose the plan that fits your catalogPick or change a plan: Builder (free), Pro ($20/mo), Max ($300/mo), Enterprise Money
The plan sets how many agents, items and transactions the account gets. Builder is free; you can upgrade any time.
How
- At sign-up, choose the plan in onboarding step 2.
- Later, open Settings → Billing and choose a plan under Plans.
- For a paid plan, Add a card.
- The change takes effect now and is prorated.
- From chat (after A4): ask your agent for your plan and billing; it calls
account_info(plan, status, renewal, card on file, next invoice). Plan and card changes stay in the Dashboard; the agent gives you the page withaccount_dashboard_link.
What you’ll see
Settings → Billing shows the new Current plan, and the Overview badge matches it.
Watch for
- Builder's card lists 1 agent, up to 5 items and 25 transactions a month; no card needed.
- The $300/mo plan is Max; some screens may still show an older name.
Walk-through
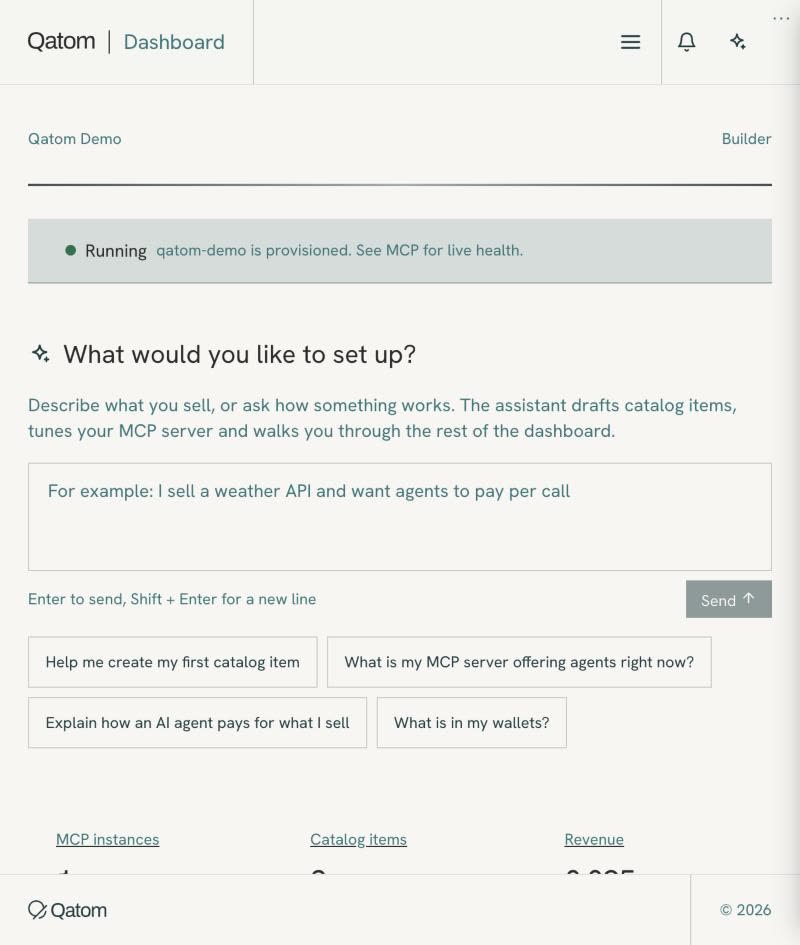
B35 Get set-up help without leaving the DashboardAsk the Dashboard assistant ("What would you like to set up?")
The Dashboard home has an AI assistant. It answers set-up questions in place, such as how to create your first item.
How
- Open the Dashboard home.
- Find the box headed "What would you like to set up?".
- Pick a starter prompt, such as "create my first catalog item" or "how an agent pays", or type your own.
What you’ll see
The assistant answers in the panel on the home page.
Watch for
- Today the assistant guides you; you make the changes yourself.
Walk-through
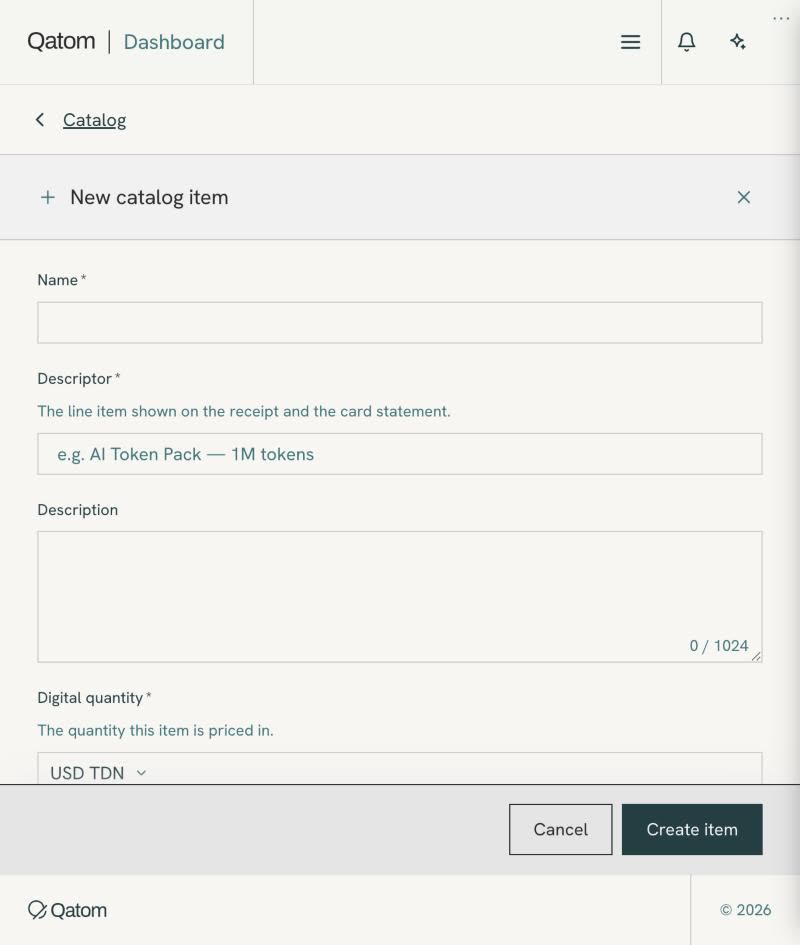
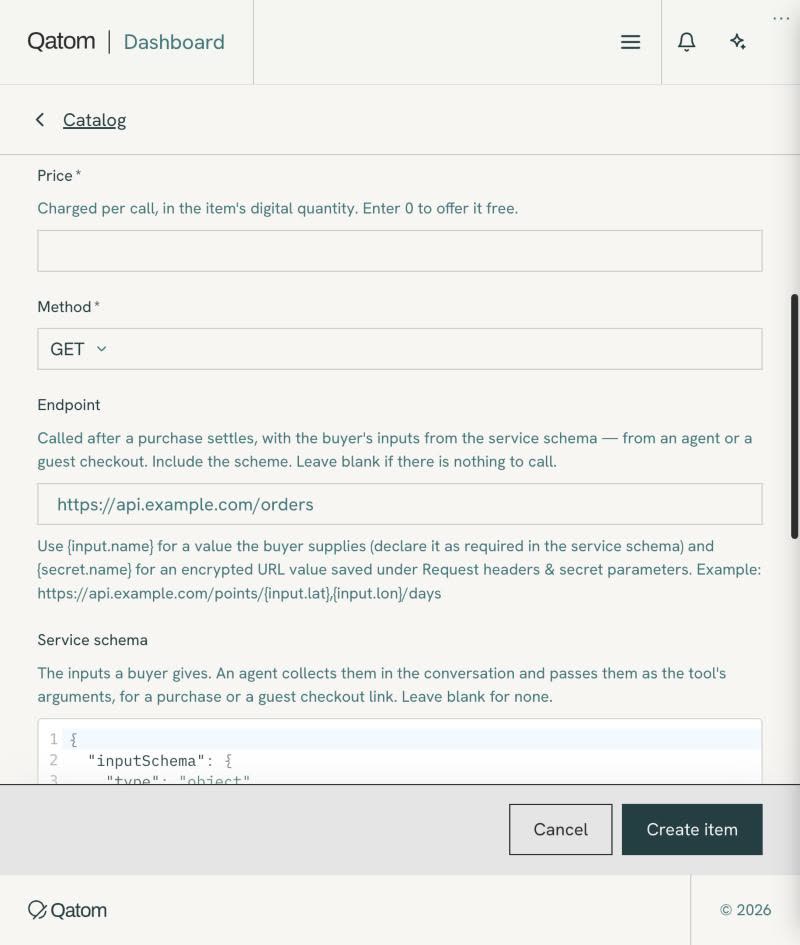
B9 List one thing for sale at one priceCreate a catalog item: name, descriptor (receipt line), price, method, endpoint
A catalog item is one thing for sale at one price, with one endpoint. Its name becomes the tool name agents see.
How
- Open Catalog and click + New item (or ask your agent to use
account_create_item). - Name: use a shared prefix, "Brand: item". Descriptor: the line on the buyer's receipt and card statement.
- Price: 0 for free ("Enter 0 to offer it free"), otherwise at least 0.001 USD-TDN.
- Method: GET, POST or PUT. Endpoint: the URL Qatom calls after payment, with no secrets in it.
- Fill in the description, schema and visibility (B10, B11, B14), add the Authorization header (B12), then click Create item.
What you’ll see
You return to the Catalog list, where the new row shows its method and price (Free or the amount).
Watch for
- Renaming the item later does not change the Descriptor.
- Choose visibility now; it can't be changed after creation (B14).
- Use no more than three decimals in the price.
Example
"Qatom Demo: space station video" is a POST item at 0.01 USD-TDN.
Walk-through
B10 Tell agents what they get before payingWrite the description (≤ 1,024 characters, points to llms.txt)
Agents read the description to decide whether to buy. It should say what returns, what is free, and where to read more.
How
- Say what the item returns, what is free, and which inputs change the answer.
- Point to your llms.txt URL.
- Add a not-advice line for health, finance, investment or legal items.
- Keep it at or under 1,024 characters; the form shows a counter (x / 1024).
What you’ll see
The counter under the Description stays at or below 1024.
Watch for
- Don't list the individual things you cover (tickers, SKUs, IDs) or give an item count.
- If the same content sells at two prices, each description says what the higher tier adds.
- When the box is full, the counter can sit over the last line; check the text before saving.
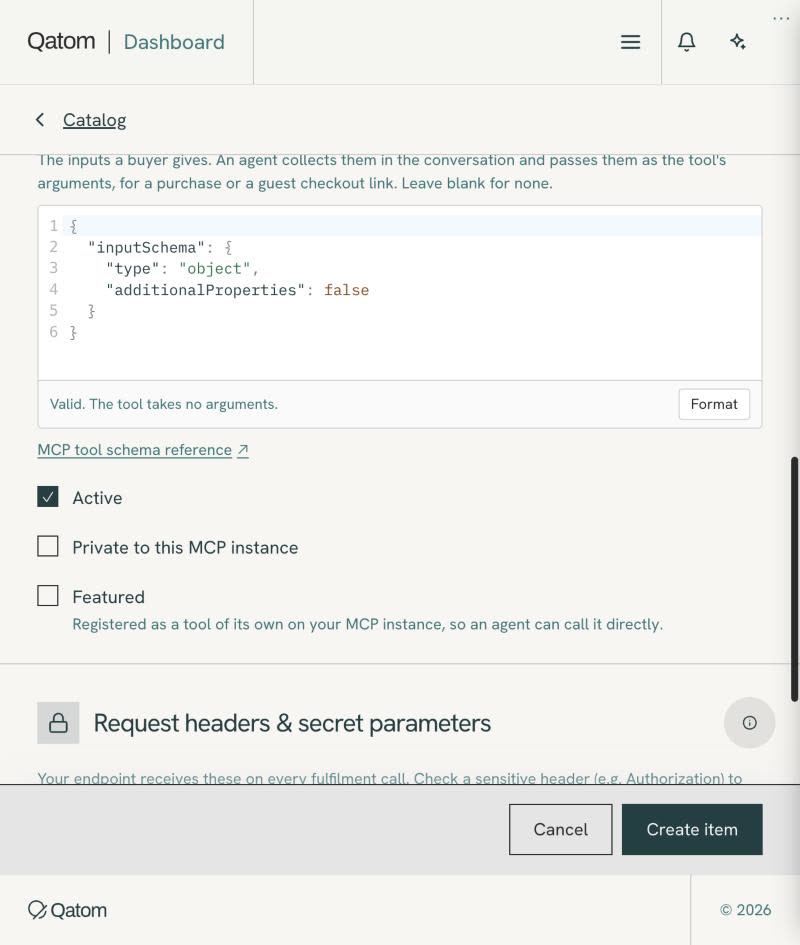
B11 Declare exactly the inputs your endpoint takesAdd the input schema (additionalProperties: false); the editor validates it
The schema tells agents which arguments to send. Qatom forwards only declared arguments and rejects the rest.
How
- Read the schema off your endpoint: one required string that identifies the item, one optional property per real input.
- Give every property a description, with its unit, range and default.
- Set "additionalProperties": false.
- Paste it into the Service schema editor in the form {"inputSchema": {...}} and click Format.
What you’ll see
The editor shows "Tool arguments: …", or "Valid. The tool takes no arguments." when there are none.
Watch for
- Leave out anything you pin in the endpoint URL or set as a fulfilment parameter.
- No example IDs or item names in the schema; describe the format instead.
- The New item editor uses {"inputSchema": {...}}, while existing items show a plain schema.
Example
The Qatom Demo video item takes one optional input, ttl_seconds, from 60 to 86400, default 3600.
Walk-through
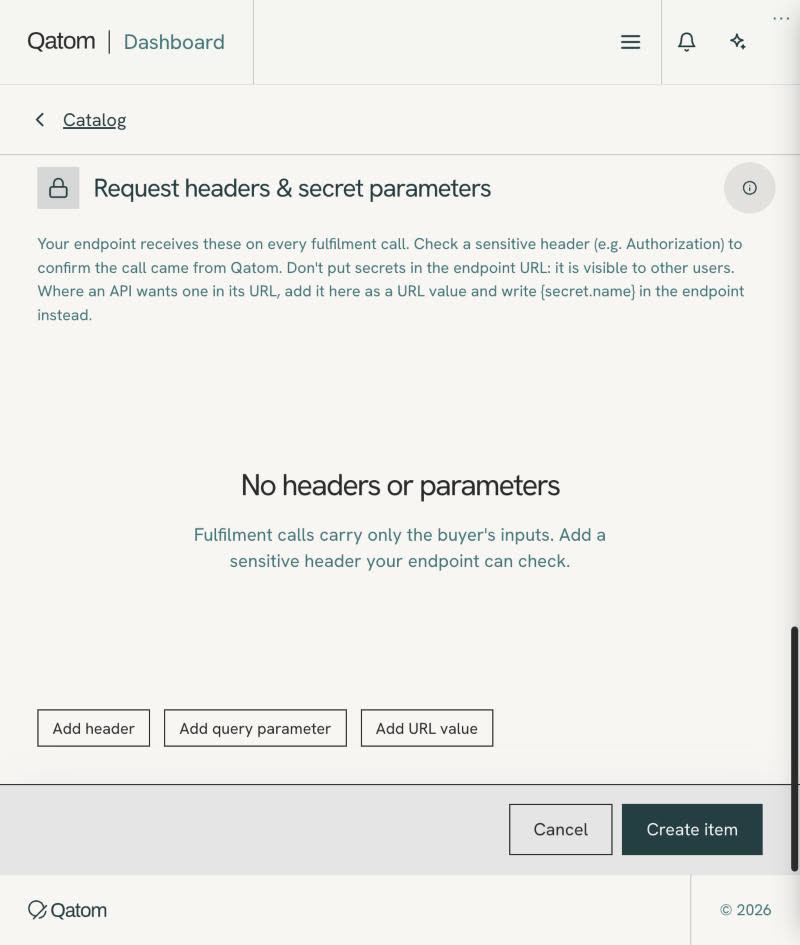
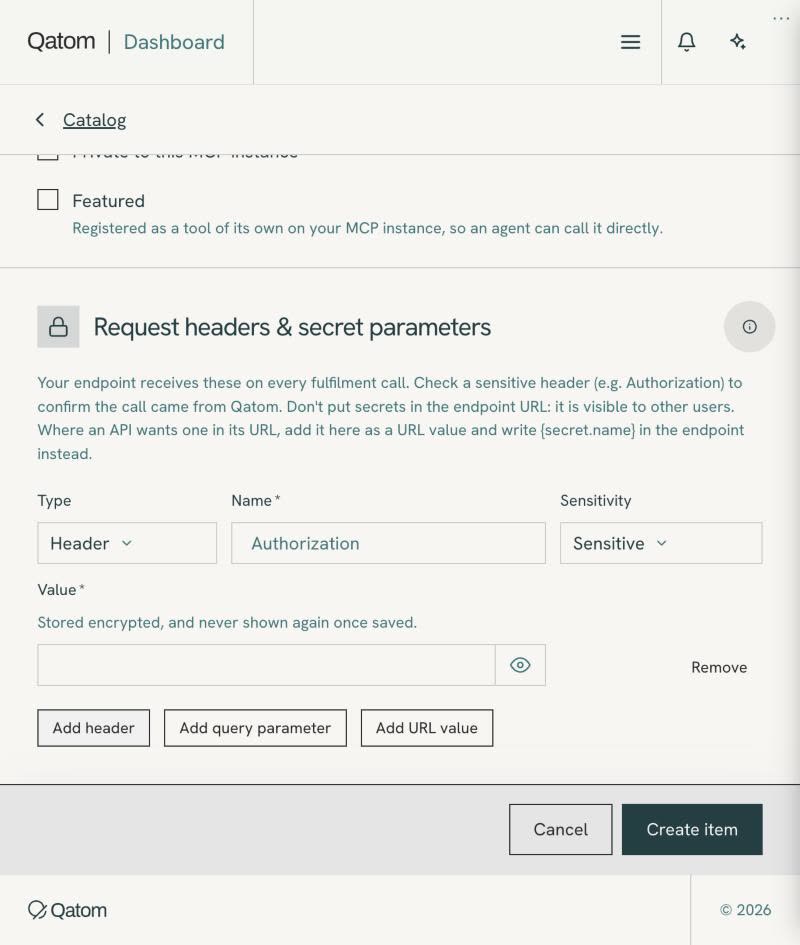
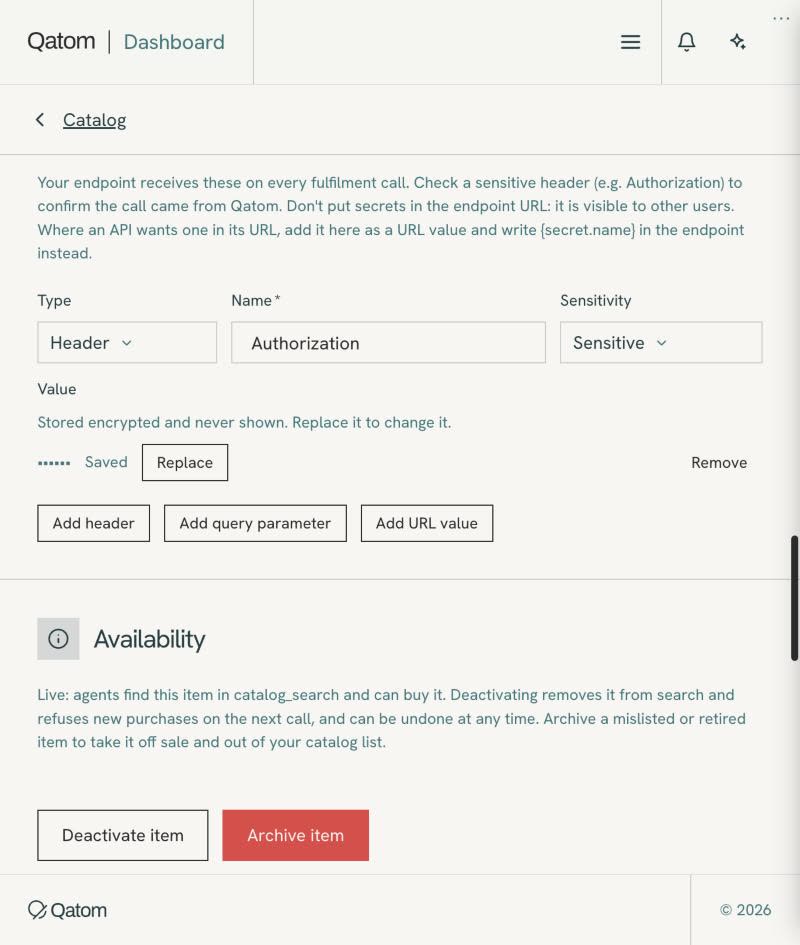
B12 Guard every paid item with a secret headerAdd Request headers & secret parameters (Authorization header, Sensitive) and save them Secret
Whatever you set here goes on every fulfilment call to your endpoint and is never shown to buyers. It lets your endpoint prove the call came from Qatom.
How
- In Request headers & secret parameters, click Add header.
- Name: Authorization. Sensitivity: Sensitive. Value: Bearer followed by your fulfilment token (type it yourself).
- Use Add query parameter or Add URL value for an upstream API key; use Not sensitive for fixed settings such as tier or format.
- On the New item form, Create item saves it; on the item page, click Save headers & parameters.
What you’ll see
The header is listed in the section with its value masked.
Watch for
- Sensitive values are never shown again; keep the value in your own secret store.
- Headers are per item: three paid items on one endpoint each need the header.
- On the item page, Save changes alone can leave the header unsaved; check it (B37).
Walk-through
B13 Put inputs and secrets into the URL safelyUse {input.name} and {secret.name} in the endpoint
Placeholders let the endpoint URL carry a buyer input or a saved secret without exposing the secret.
How
- Write {input.name} where a buyer input belongs, and declare that input as required in the schema.
- Write {secret.name} where a secret belongs, and save it as a URL value under Request headers & secret parameters.
- Example:
https://api.example.com/points/{input.lat},{input.lon}/days?key={secret.apikey}.
What you’ll see
A test purchase returns the answer for the inputs you sent.
Watch for
- Never type a real secret into the endpoint URL; other dashboard users can see it.
B14 Pick public or private once, at creationChoose public or private when you create the item
Public items appear in the master catalog search. Private items are reachable only through your own MCP instance, and the choice is fixed.
How
- On the New item form, leave "Private to this MCP instance" off for anything sold through the catalog.
- Tick it only for items that stay on your own instance, such as an internal tool or a single customer's item.
- Click Create item.
- On the item page, check Visibility under Commodity.
What you’ll see
The item page shows Visibility as Public or Private, read-only.
Watch for
- In the Dashboard, visibility can't be changed later; to go public, duplicate the item (B36).
- To confirm
account_update_itemnow lists a private field, which may let an agent change visibility with your approval. - Private items don't show in
catalog_searchand can't be bought through the master MCP. - The catalog list shows no Private badge, and a private item's Availability text may still mention
catalog_search.
Walk-through
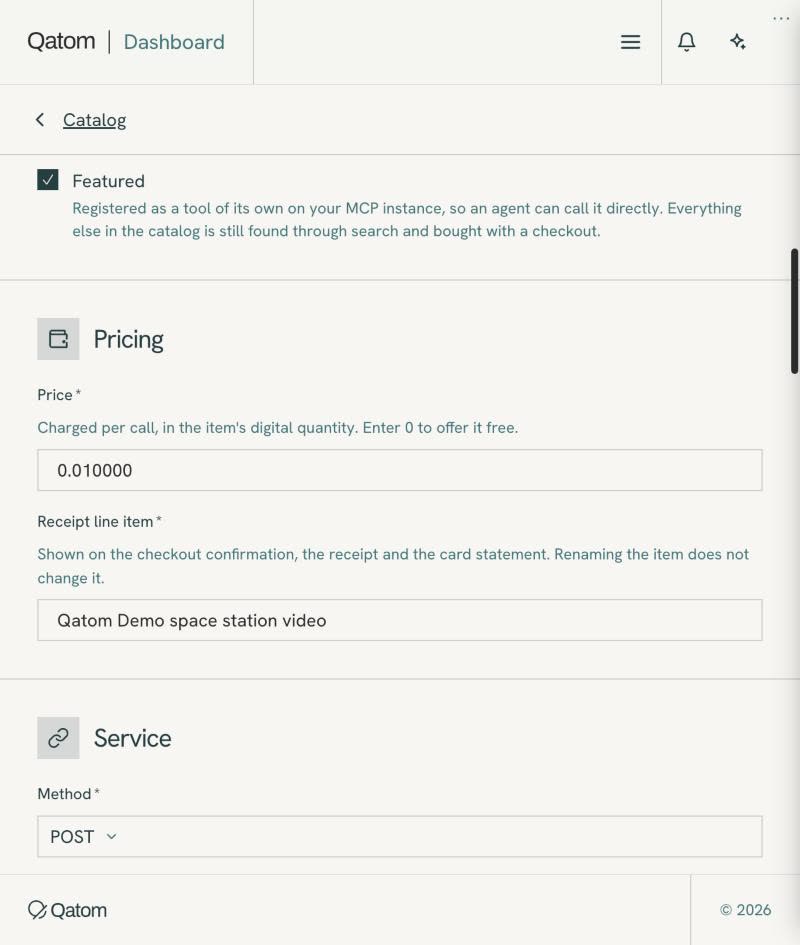
B15 Give an item its own named toolFeature items on the seller's own MCP instance
A featured item is registered as a tool of its own on your MCP instance, so agents connected there see it by name.
How
- Tick Featured on the New item form, or in the Agents section of the item page.
- Save the item.
- Open MCP → Tools and check the item under Featured items.
What you’ll see
The item appears as a named tool, with its schema, on MCP → Tools.
Watch for
- MCP → Tools may list platform tools under Featured items with a "could not be found" note. Check your own items there.
Walk-through
B16 Give buyers a free way to reach youAdd the free customer-feedback item (a default for every catalog), plus free checks beside paid items
Buyers use the feedback item for questions, problems and refund requests. Free checks let agents confirm an input before they pay.
How
- Open Catalog and look for a free customer-feedback item; if there is none, create one with + New item at price 0.
- Name it with your prefix ("Brand: customer feedback"); inputs: message (required, 3 to 2,000 characters), optional
from_emailandsubject_ref. - Have the endpoint store each message and forward it to your account email, with an hourly cap (30 is a good start).
- Beside each paid item, add a free search, check, preview or status item.
What you’ll see
A test call to the feedback item is free and returns a reference id.
Watch for
- Never accept feedback nobody will read; the template answers 503
not_configureduntil storage or email is set up. - A free answer is one fixed fact or an identity check, never something a script can sample for the paid value.
- Today the seller creates the feedback item; Qatom will create it automatically for new catalogs soon.
Example
"Qatom Demo: customer feedback" is free and returned a reference id in testing; Centaur League's feedback item is the original reference.
B37 Confirm the secret header really savedAfter saving headers, reload the item and check the header is listed (value masked)
A paid item without its header fails every fulfilment call after the buyer pays. A reload is the only reliable check.
How
- After Save headers & parameters, reload the item page.
- Check the form shows the item you opened (name and price).
- Check Request headers & secret parameters lists Authorization with the value masked.
- If it says "No headers or parameters", add the header again and click Save headers & parameters.
What you’ll see
The section lists the header with its value masked.
Watch for
- A "Catalog Item Updated" toast after Save changes does not mean the header was saved.
- Headers entered on the New item form are saved by Create item; the risk is on the item page.
Walk-through
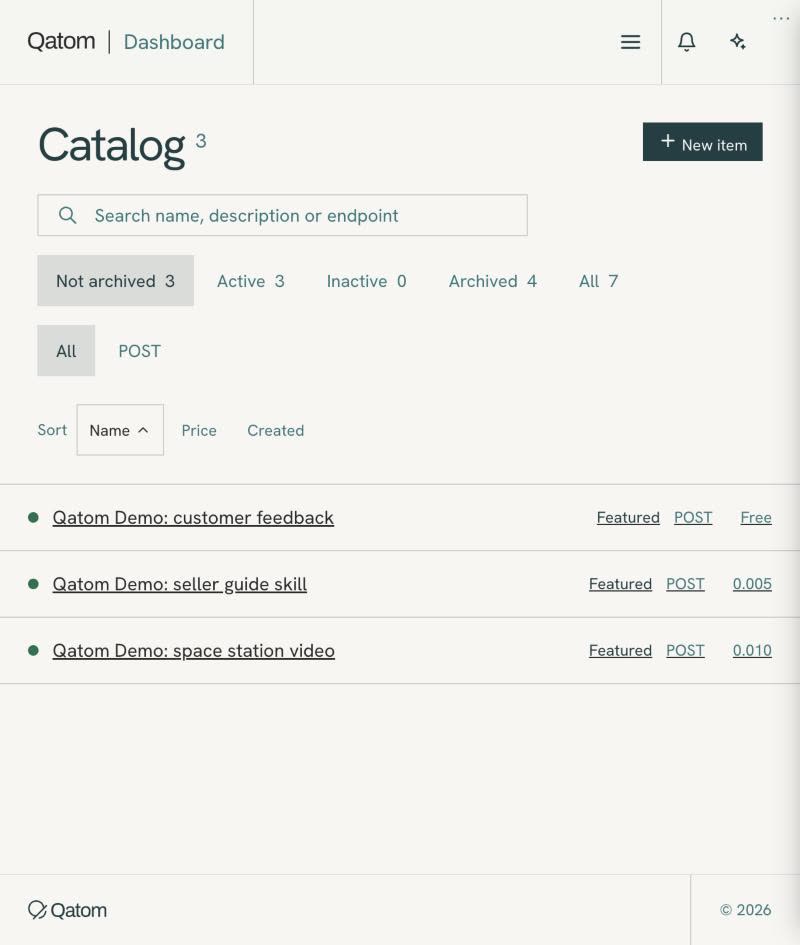
B17 Find, filter and update any itemFind, filter and edit items
As the catalog grows, search and filters keep it manageable. Edits to price and schema reach the master MCP and your instance.
How
- In Catalog, search by name, description or endpoint.
- Filter by Not archived, Active, Inactive, Archived or All, and by method; sort by Name, Price or Created.
- Open an item, change the fields and click Save changes; to make a variant, use Duplicate (B36).
- From chat, ask your agent to list items (
account_catalog) or edit one (account_update_item).
What you’ll see
Each filter shows its count, and saving shows a "Catalog Item Updated" toast.
Watch for
- Before saving, check the form shows the item you clicked; item pages can load slowly or keep the previous item's values.
- In a narrow window the item detail pane may not show; widen the window.
Walk-through
B36 Copy an item, then retire the old oneDuplicate an item, then archive the old one Secret
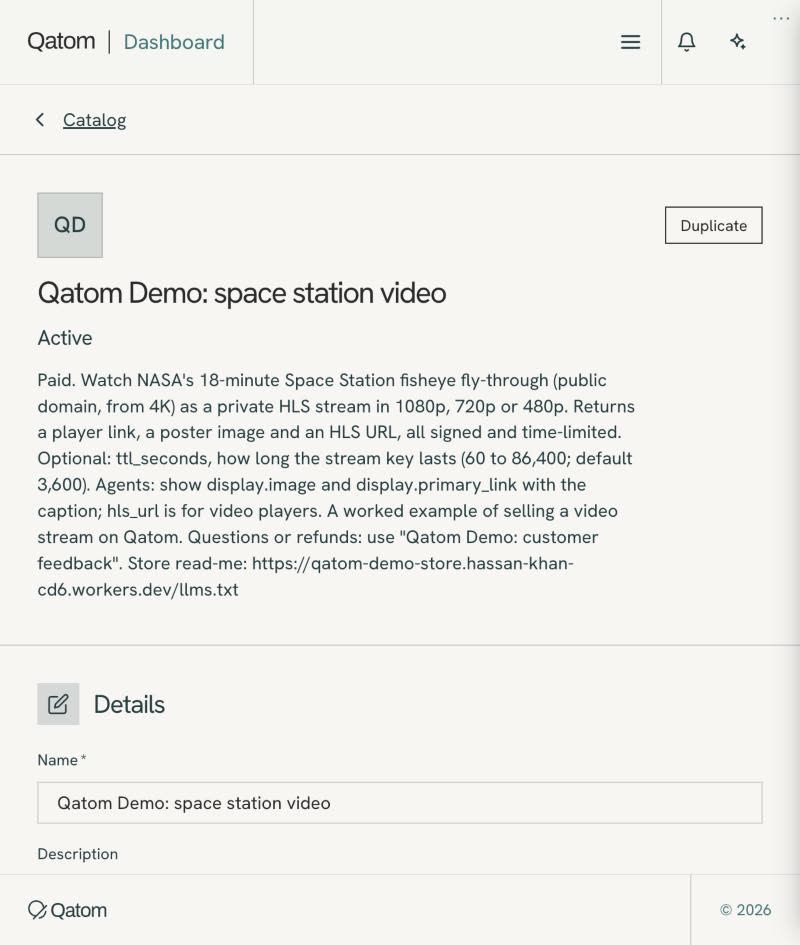
Duplicate is how you make a variant, and the only way to turn a private item public. The copy is a new item with a new id.
How
- On the item page, click Duplicate; the New item form opens prefilled.
- Change what differs; to go public, untick Private to this MCP instance.
- Re-enter each sensitive value ("Sensitive values were not copied; enter them again"), then Create item.
- On the old item, Availability → Archive item, and update llms.txt and anything else that names the old id.
What you’ll see
The copy appears in the Catalog list with a new item id, and the old one shows under Archived.
Watch for
- Check the Private switch on every copy; a copy may keep the original's setting.
- The copy also gets a new provider twin, so payments land in a new place.
- Archive item has no confirmation dialog.
Walk-through
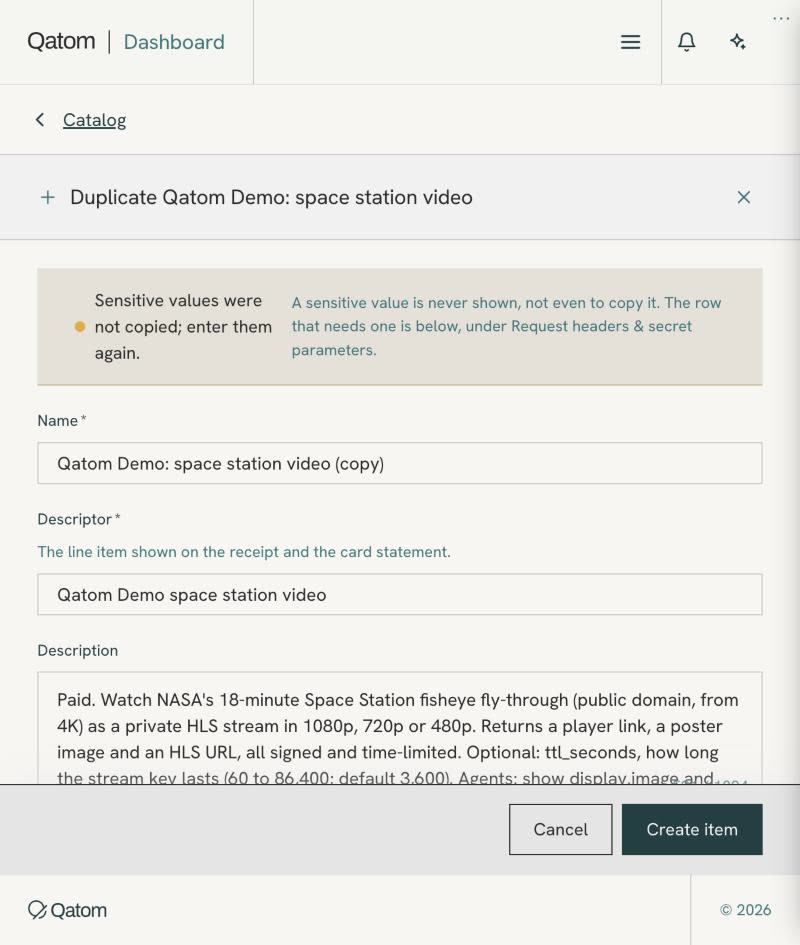
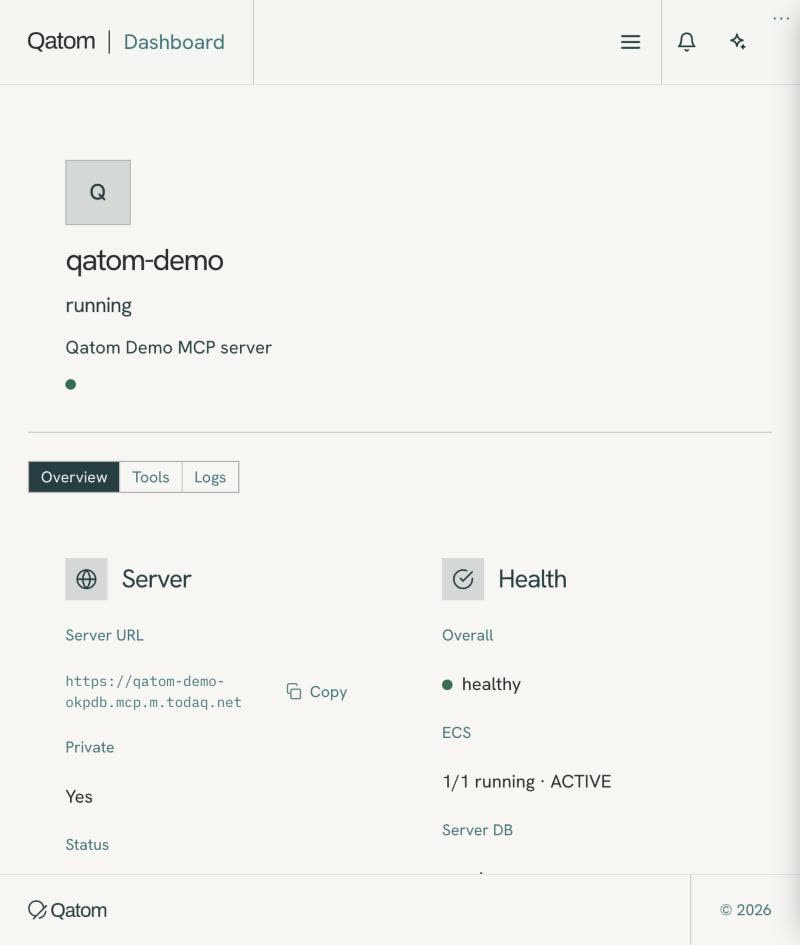
B18 Make sure your own MCP server is healthyCheck the MCP instance: server URL, health, tools, logs
Your MCP instance serves your featured and private items. Check it is healthy before testing or sharing its URL.
How
- Open MCP → Overview: copy the Server URL and check Status, Deploy version and Health (Overall, ECS tasks, Server DB, HTTP check).
- Open Tools: check your featured items and the built-in tools, each with its input schema.
- Open Logs for recent activity.
- From chat, ask your agent for the server details (
account_mcp_server).
What you’ll see
Health reads healthy and your featured items are listed under Tools.
Watch for
- A new instance needs a few minutes to become healthy; trust Health, not the Overview banner.
- If Logs look old, check Status and Health instead.
Walk-through
B39 Keep your MCP server on the latest versionUpdate your MCP server when the Dashboard offers it To confirm
When Qatom releases a new server version, the MCP page offers an update. Updating keeps your tools in step with the master MCP.
How
- Open MCP → Overview.
- If it shows Update available, click Update instance.
- Wait until Health reads healthy again, then check your featured tools under Tools.
What you’ll see
The deploy version rises and Health returns to healthy.
Watch for
- To confirm Whether buyers' calls pause during the update.
B19 Buy every item once before you announceTest straight away: buy each item once (public items through the master MCP, private items through your own instance) before announcing Money
A real purchase is the only full test of price, schema, header and endpoint together. Do it as soon as the item exists.
How
- Connect the master MCP (
https://mcp.m.todaq.net/mcp); for private items, connect your instance's Server URL instead. - Fund the agent twin with a small amount (
fund_primary_walletor A32, thentransfer_to_agent). - Find the item with
catalog_searchand buy it withagent_checkout, item alone and with inputs. - Approve the purchase when asked, unless its price is within your auto-approve limit.
- Also try a bad input and check the error is clear.
What you’ll see
The receipt shows your endpoint's answer and a transaction id.
Watch for
- A call your endpoint rejects can still be charged, and a retry is a new charge.
- Free items cost nothing to test.
- Private items are not found through the master MCP; that is expected.
Example
All three Qatom Demo items were bought through the master MCP. Feedback returned a reference id, the skill's SHA-256 matched and the video played at 1080p.
B38 Pass the launch checks, then go liveRun the launch checks before announcing
The seller guide's launch report checks each item the way a buyer's agent meets it. Announce only when it passes.
How
- Ask your agent, with the seller guide skill installed, to run the launch report for your items.
- Fix each failure it lists, such as a missing feedback item, an endpoint URL holding a secret, or a description without your llms.txt link.
- Run it again until every item passes.
What you’ll see
A launch report listing each item with its checks passed.
Watch for
- Test buys (B19) come first; the report uses their results.
B40 Get ready for cart purchasesExpect buyers to buy your items in carts
Buyers can put your items in a cart with other items, from you or other sellers, and pay once. Each item in the cart reaches your endpoint as its own paid call, with its own inputs and transaction id.
How
- Make sure each item works as a single call; a cart sends one call per copy, after payment.
- Return a clear summary and links in every answer: the buyer's agent shows them once, in the cart's reply.
- Keep inputs fully described in the item's schema, so agents can collect them before adding the item to a cart.
- Test by putting two of your items in one cart and paying from an agent wallet (A33, A34).
What you’ll see
Your sales show one transaction per item copy, the same as single purchases.
Watch for
- Links in your answer should outlast the moment the cart is paid; a 15-minute link can expire before a buyer reads a long reply.
- A buyer may stop a cart partway; items already delivered stay bought.
Example
Qatom Demo's feedback, skill and video items were bought together in one cart on 12 Oct; each returned its own answer.
B20 Serve each paid sale once, and only onceVerify a fulfilment call is a real sale (X-Qatom-Transaction-Id)
For anything expensive to serve, check each call matches a settled sale of your item. This stops replayed or forged calls.
How
- Read the X-Qatom-Transaction-Id header on each fulfilment call.
- Call GET /v4/catalog/purchases/{
transaction_id} with your account credentials (B30). - Refuse the call if the id is unknown or belongs to another item.
- Keep the ids you have served, so no sale is served twice.
What you’ll see
The API returns the settled sale for your item, and your endpoint serves it.
Watch for
- Use this for stream keys, downloads and game entries; cheap reads can rely on the fulfilment header.
B21
Check you are findable, then tell peopleConfirm public items show in catalog_search, then announce them (share llms.txt, STORES.md)
Buyers find items through catalog_search on the master MCP. Announce only once your items show there and pass your launch checks.
How
- On the master MCP, run
catalog_searchfor your brand prefix. - Check each public item's name, price, seller name and description.
- Run the seller guide's launch report and fix any failure.
- Announce: share your llms.txt URL and add your store to STORES.md (B26).
What you’ll see
catalog_search lists each public item with your business name as the seller.
Watch for
- Private items never show in
catalog_search; that is by design. - Delist or archive test and placeholder items before you announce.
- To confirm How long a new public item takes to appear in
catalog_search. If it is missing, wait a few minutes and search again before assuming it failed.
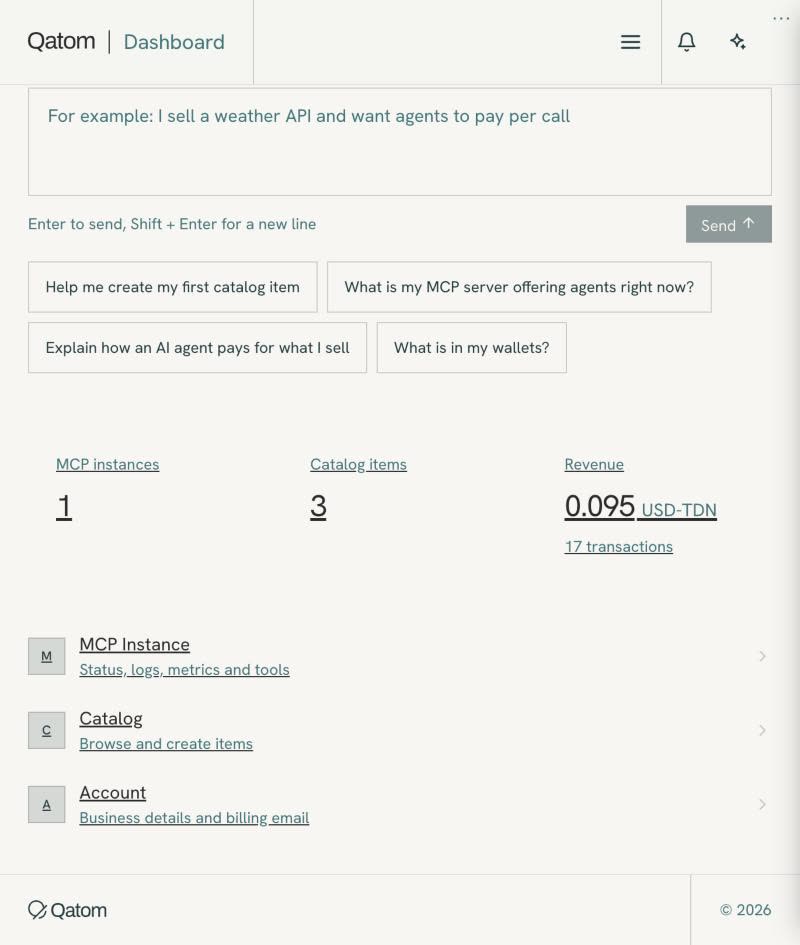
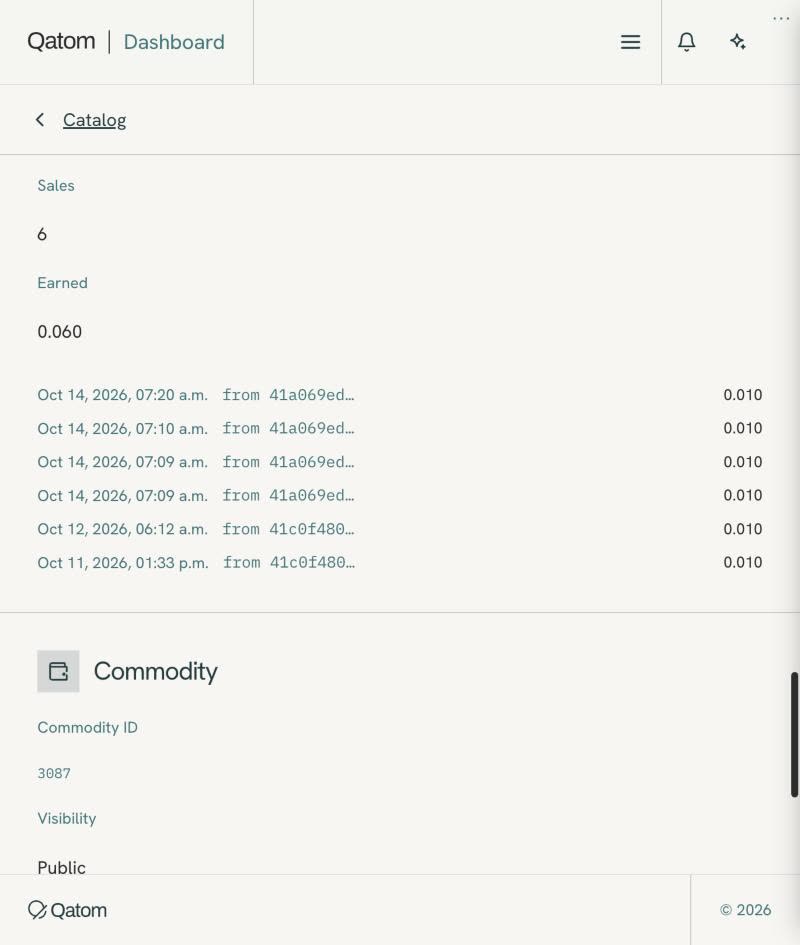
B22 See what each item has earnedRead sales and revenue
Sales figures show which items sell. Item revenue lands on each item's twin; the Console shows who paid.
How
- On the Overview, read the Revenue tile (USD-TDN and transactions).
- On an item page, read Sales: Sales count and Earned.
- By API, GET /v4/catalog/revenue totals what your items have earned.
- To see who paid, open the item's twin in the Qatom Console.
- From chat (after A4): ask your agent what your catalog has earned; it calls
account_sales(all-time total and number of sales, or one item's latest sales withitem_id).
What you’ll see
The item page shows its Sales count and Earned in USD-TDN.
Watch for
- The Revenue tile links to the Catalog list; a dedicated revenue view is still to come.
- The transaction count is meant to cover paid transactions only.
Walk-through
B23 Let your agent change settings, with your yesMake an account change through an agent with approval
Your agent can prepare account changes in chat: create or change an item, change business details, rename a wallet, reboot your MCP server. Nothing changes until you approve that exact change.
How
- Choose your seller account for the chat first (A4).
- Ask your agent for the change; it calls the matching tool (
account_create_item,account_update_item,account_update_details,account_rename_walletoraccount_reboot_server) and gives you an approval link. - Sign in (a passkey is one tap). The page shows the Change and the Account; check both, then approve.
- When it says "Approved. Go back to your conversation to let the agent finish", tell the agent. It calls
account_finish_change, which makes the change once and refuses a second try.
What you’ll see
The agent reports the change as done, and the account shows it (for example the new wallet name in account_wallets or the seller Dashboard).
Watch for
- Secrets never go through chat: for an item's headers, the agent gives you a Dashboard link instead (A26).
- The account_ tools (
account_choose,account_wallets,account_dashboard_linkand the rest) are listed on some connections and not others, and they work only once a business account is chosen. To confirm Which connections list them.
Example
On 12 Oct the Dobox seller account renamed an unused duplicate wallet from chat: one approval page, then account_finish_change; a second finish call was refused.
B24 Change a secret without breaking salesRotate a fulfilment secret with no failed calls Secret
Rotate the fulfilment token whenever it may have leaked. A short overlap keeps every call working.
How
- Generate a new value on your own machine (openssl rand -hex 24).
- Have the endpoint accept both the old and the new value for a few minutes.
- Set the new value in your host's secret store and on each item's Authorization header, then Save headers & parameters.
- Reload each item to check the header (B37), then remove the old value from the endpoint.
What you’ll see
A test purchase succeeds, and a direct call with the old value gets 404.
Watch for
- Headers are per item; update every paid item that uses the token.
B25 Pause or retire an itemDeactivate or archive an item
Deactivate pauses sales and can be undone. Archive takes a retired or mislisted item off sale; it then shows only under the Archived filter.
How
- Open the item page and go to Availability.
- Click Deactivate item to take it out of search and refuse new purchases; you can turn it back on.
- Or click Archive item to take it off sale; it then appears only under the Archived filter.
What you’ll see
The item shows under the Inactive or Archived filter in the Catalog list.
Watch for
- Archive item has no confirmation dialog; use Deactivate if you may want it back.
Walk-through
B26 Get your store seen and scoredGet listed in STORES.md and rated by the Rating & Review service To confirm
STORES.md lists live Qatom stores. The Rating & Review service scores listings against the seller guide.
How
- Open a pull request adding your store to STORES.md in the qatom-hack-the-andes repository.
- Follow every seller guide stage, including the launch checks, so the listing scores well.
What you’ll see
Your store appears in STORES.md once the pull request is merged.
Watch for
- To confirm Ratings are launching; how a store is submitted for rating is to be confirmed.
B27 Answer refund requests from your primary walletHandle billing disputes and refunds: read feedback, check the transaction, refund from the primary Money
Buyers ask for refunds through your feedback item. Payments settle at once; refunds are your decision and go back to the wallet that paid.
How
- Read the feedback message and note the transaction id.
- Check the sale: GET /v4/catalog/purchases/{
transaction_id}, or the item's twin in the Qatom Console. - If you refund, use Send on your primary twin (Transfer role) to the wallet that paid, or POST /v4/transfer.
- Reply to the buyer with what you did.
What you’ll see
A Sent row appears in the primary twin's Transactions.
Watch for
- Funds must be in the primary twin; item revenue reaches it through a standing distribution.
- Never retry a transfer that returned 202; it already moved.
- Don't promise the buyer a timeline.
B28 Show buyers a board, card or player in chatBuild an interactive MCP App view for buyers (optional)
An MCP App view puts a live board, card or player inside the conversation. Keep it on a free server; money stays on Qatom.
How
- Start from examples/mcp-app-minimal in the qatom-use-cases repository.
- Attach a view to a tool and return both text for the model and structuredContent for the view.
- Host it as your own free MCP server, separate from your paid items.
- Tell buyers to add it as a second connector beside the master MCP.
What you’ll see
In a client that supports MCP Apps, the tool result opens as an interactive view in the chat.
Watch for
- MCP Apps (boards, cards, players inside the chat) work in Claude, ChatGPT and Hermes today. Grok and Muse don't support them yet.
- No purchase starts inside a view; the human approves money in Qatom's own flow.
- Change the view's URI suffix (-v1, -v2) on every change; hosts cache views.
Example
Centaur League's view_match opens a chess board in the chat from its free server at centaurleague.games/mcp.
B29 Issue and revoke keys for your accountCreate and revoke account API keys Secret
Account API keys let your own systems call Qatom for this account. Revoke any key you no longer use.
How
- Open Settings → API Keys.
- Under Create a key, enter a name and create it.
- Store the key in your secret store, never in a repo or chat.
- To stop a key working, click Revoke beside it.
What you’ll see
The key is listed with its created and last-used dates.
Watch for
- Check last used before revoking a key a system may still need.
B30 Get the credentials your server usesGet your server credentials and public secret Secret
Your server exchanges the client credentials for an account token for calls such as payouts and sale checks. The public secret is for embeds and guest checkout.
How
- Open Settings → Secrets.
- Copy the Client ID; click Reveal to see the Client secret.
- Store both on your server only, then exchange them for an account token at /v4/account/oauth/token.
- Copy the Public secret for embeds and guest checkout.
What you’ll see
The Secrets tab shows the Client ID, a hidden Client secret with Reveal, and the Public secret.
Watch for
- Never put the client secret in a browser, app or repo.
- The public secret is publishable; the client secret is not.
B31 Know which wallet holds whatSee your twins, rename them and find a twin's API key Secret
Your account holds several twins: primary, agent, and one provider twin per item. Payments land on the item's provider twin.
How
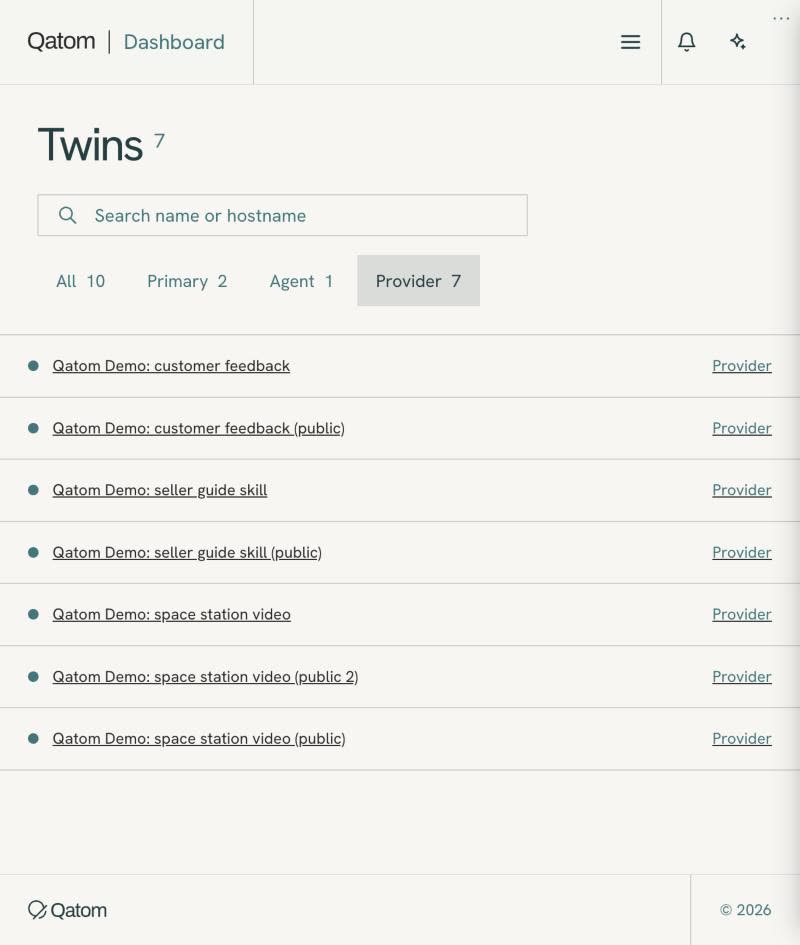
- Open Twins; search by name or hostname, and filter by All, Primary, Agent or Provider.
- Open a twin to see its Twin ID, Hostname, Type and balances.
- Change its display Name and click Save name.
- Copy its API key only when you need it, for example for Payment Multiplex payers.
What you’ll see
The twin page shows its identity, name and balances by digital quantity.
Watch for
- The API key gives direct access to the twin; treat it as a secret.
- Provider twins appear only once items exist.
Walk-through
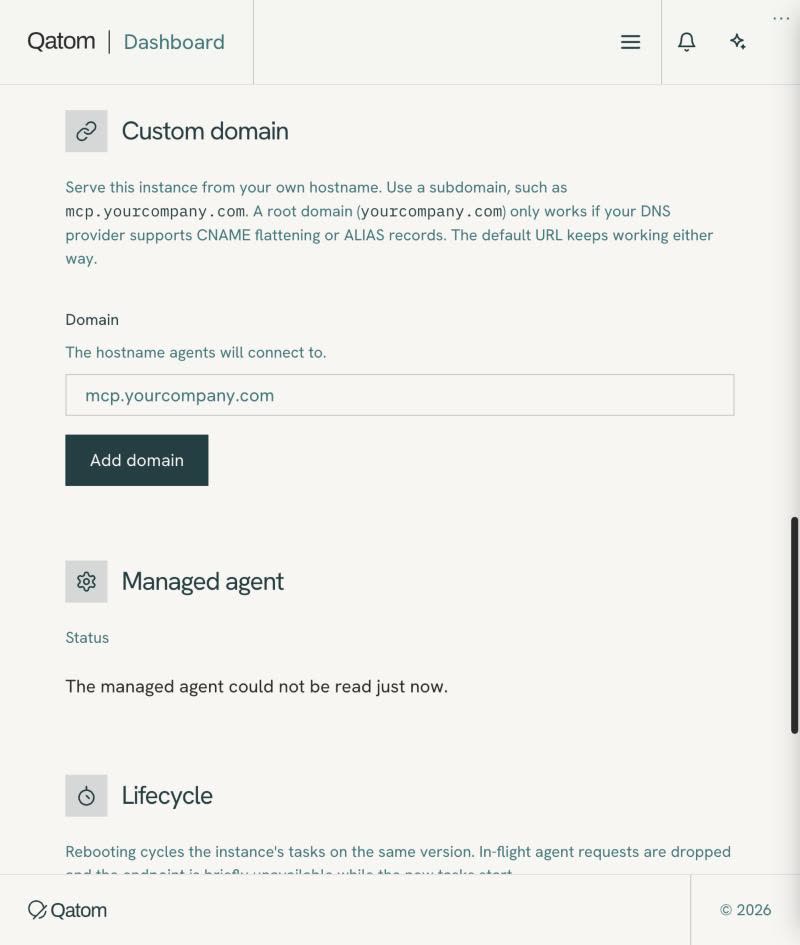
B32 Put your MCP server on your domainServe the MCP instance from your own domain To confirm
A custom domain lets buyers connect to your instance at an address you own. The default URL keeps working.
How
- Open MCP → Overview → Custom domain and click Add domain.
- For a subdomain, add a CNAME record at your DNS provider.
- For a root domain, use CNAME flattening or an ALIAS record.
What you’ll see
To confirm Your domain is listed under Custom domain.
Watch for
- The default server URL keeps working, so existing connections don't break.
Walk-through
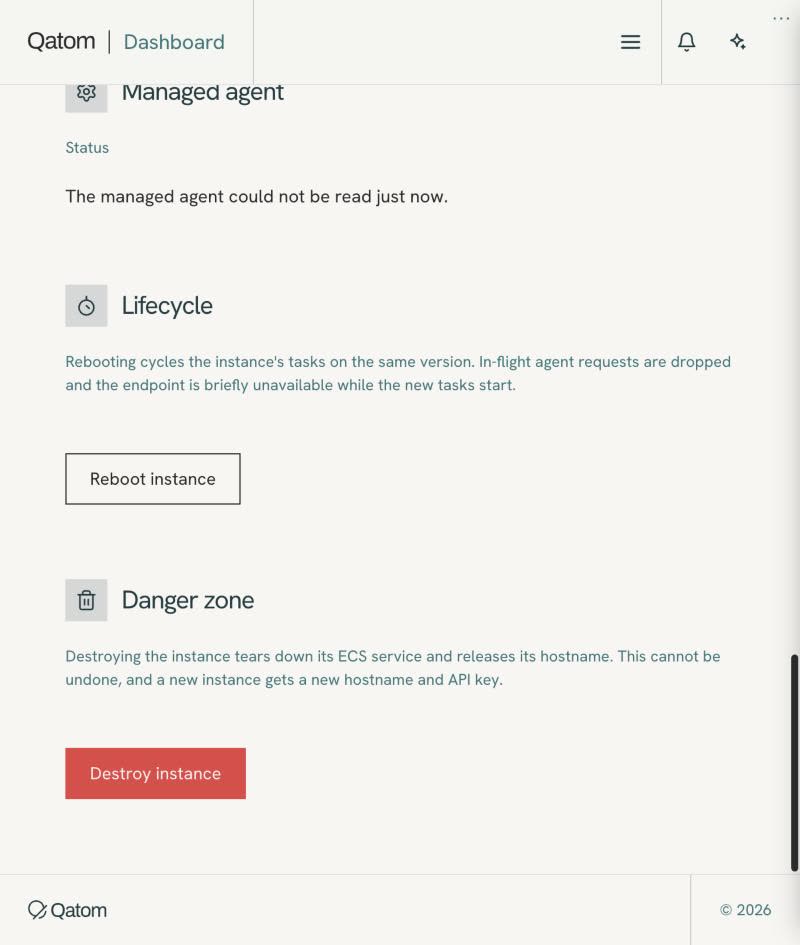
B33 Restart your server, or remove it for goodReboot the MCP instance after changes; destroy it (irreversible)
Reboot restarts your instance. Destroy removes it permanently and changes its hostname and key.
How
- To restart, open MCP → Overview → Lifecycle and click Reboot instance, or ask your agent (
account_reboot_server). - Check Status and Health afterwards.
- Only to remove the instance for good: Danger zone → Destroy instance.
What you’ll see
After a reboot, MCP → Overview shows the instance running again.
Watch for
- Reboot drops in-flight requests briefly.
- Destroy is irreversible: the instance gets a new hostname and API key, so update every connection to it.
Walk-through
03 · In the Qatom Console · 32 steps
Console
Everything after the sale happens in the Qatom Console at console.todaq.net, twin by twin: payments, distributions, cash-outs.
C1 Sign in to the Qatom ConsoleSign in to the Qatom Console (emailed link or passkey) and authorize it
The Qatom Console is where owners see, verify and move what their twins hold. The first sign-in also asks you to authorize the Console.
How
- Go to console.todaq.net and click Sign in to TODAQ Enterprise.
- Use your passkey, or enter your email and click Send sign-in link.
- Open the emailed link within 15 minutes.
- First time only: review what Qatom Console asks for (identity, email, group memberships) and authorize it.
What you’ll see
Home opens with My Twins, listing each twin you can reach with its role badge and balance.
Watch for
- The sign-in link expires after 15 minutes; send a new one if it has.
- Later sign-ins skip the authorize screen.
C2 Sign in faster with a passkeySet up a passkey Secret
A passkey lets you sign in without waiting for an emailed link. It stays on your own device.
How
- Sign in with an emailed link (C1).
- In the left menu open Account → Passkeys.
- Under Register New Passkey, give it an optional name (for example your laptop) and click Register Passkey.
- Follow your device's prompt.
What you’ll see
Your Passkeys lists the new passkey with its created date, with Rename and Delete.
Watch for
- Only the person who owns the sign-in creates or uses a passkey; an agent never does.
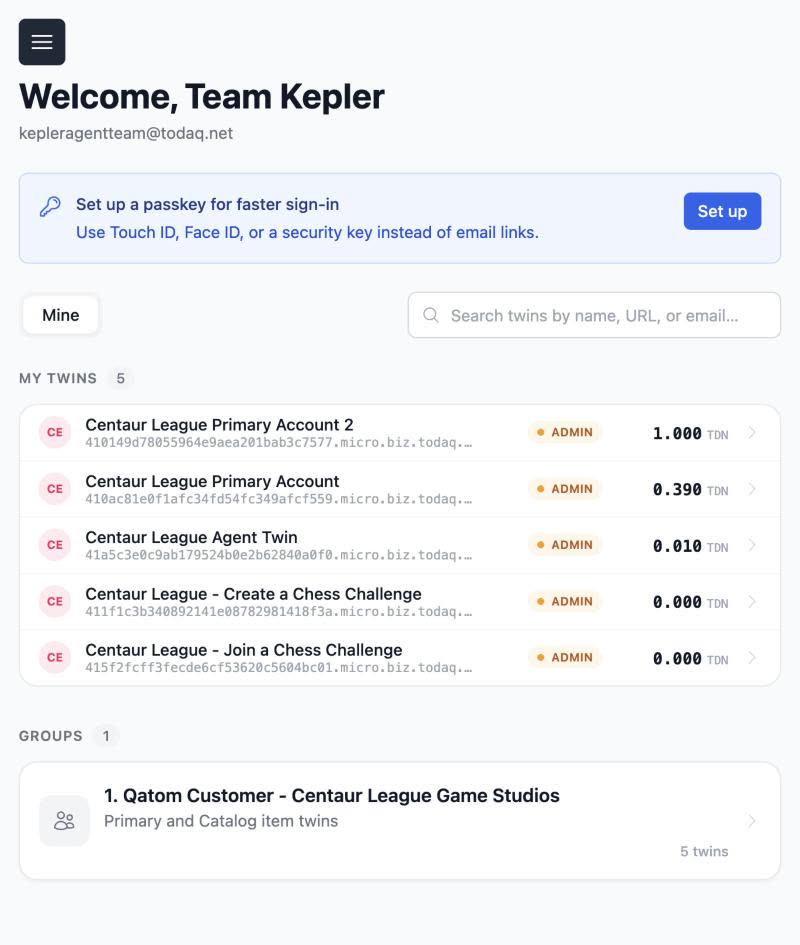
C3 Find every twin you can reachFind your twins: search, pin, role badges, balances
Home lists the twins you have access to, with your role on each. Start here to find the wallet you need.
How
- Open Home; Mine lists your twins.
- Search by twin name, URL or email.
- Click the star on a twin to pin it.
- Read each twin's role badge (Admin, Transfer or Read-only) and balance.
What you’ll see
Each row shows the twin's name, host, role badge and balance.
Watch for
- Right after your role changes, some twins can show without a name or balance; sign out and in again (C32).
Walk-through
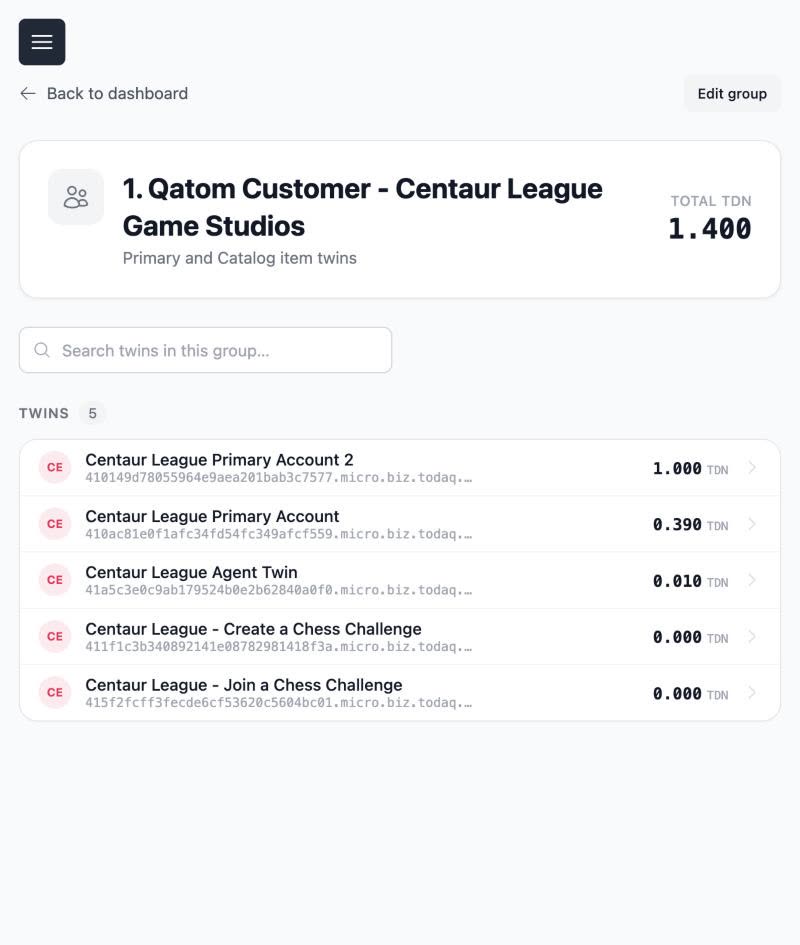
C4 See a whole group's balance at onceOpen a twin group and see its total USD-TDN
A twin group holds the twins of one customer or project. Its page adds up the balance across all of them.
How
- On Home, open Groups (shown to group managers).
- Click a group to open its page.
- Read Total TDN, and search the group's twins.
What you’ll see
The group page shows Total TDN and the list of twins in the group.
Watch for
- You need the Manager role on the group to see Groups.
Example
The Centaur League group holds its primary twins, agent twin and catalog item twins.
Walk-through
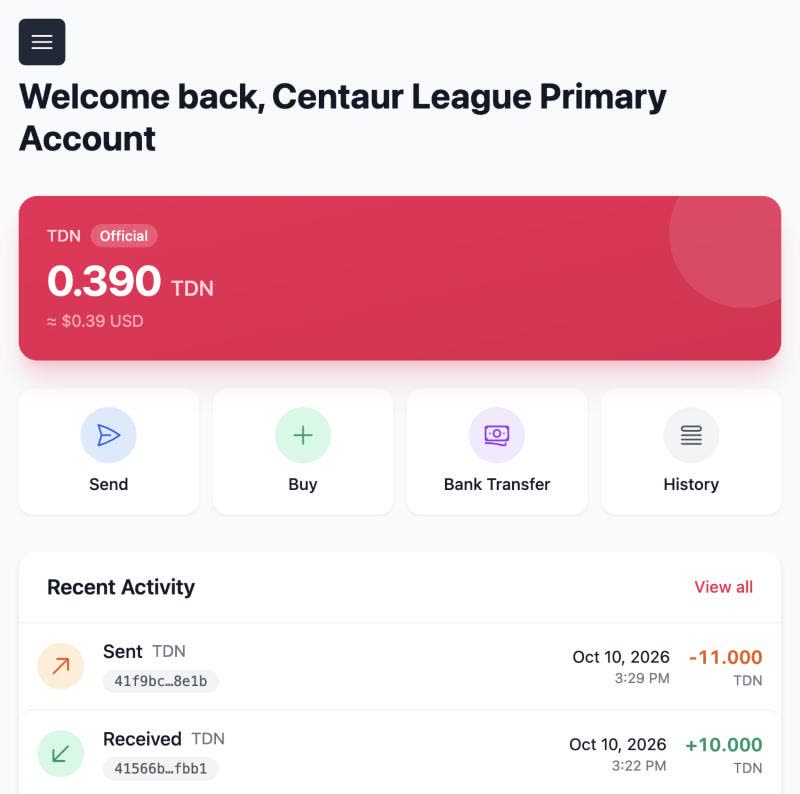
C5 See a twin's balance and latest activityRead a twin's wallet card and recent activity
A twin's page is its wallet: the USD-TDN balance (shown as TDN) and who it paid or was paid by lately.
How
- From Home, click a twin.
- Read the wallet card: token, balance and approximate USD value.
- Use the card's buttons as needed: Send, Buy, Bank Transfer, History.
- Scroll to Recent Activity to see counterparties by name or email.
What you’ll see
The wallet card shows the TDN balance with its USD value, above Recent Activity.
Watch for
- Send needs the Transfer role; Admin alone does not enable it.
- Catalog item twins with a standing distribution have no Send; sending is handled by the distribution.
Walk-through
C6 See exactly what a twin holdsSee TODA files: binder, identity root, USD-TDN notes
Every USD-TDN note and record a twin holds is a TODA file. Inventory lists them, so you can see what the twin owns.
How
- Open the twin, then Wallet → Inventory.
- Under TODA Files, open the binder (the twin's record of every file) or the identity root (SDA).
- On the TDN card, read the balance and the notes that make it up.
- Click View transactions to jump to the history.
What you’ll see
The binder reads "Valid twin binder of record" and the TDN card lists each note with its value.
Watch for
- USD-TDN are held as notes of set values, like cash; a payment sends whole notes and keeps the change.
C7 Trace a note's full historyInspect a note: minting info and provenance history
Each note carries its own audit trail. Use it to prove where money came from and how it moved.
How
- In Wallet → Inventory, click a note on the TDN card.
- Read Note Value and Minting Info: issuer TODAQ Micro Inc., asset TDN, prepaid US dollars, and the TDN terms.
- Read Provenance History: each revision, transfer and split, with its hash and controlling twin.
What you’ll see
Provenance History lists every step in the note's life, each with a hash and the twin that held it.
Watch for
- To prove a payment to someone else, pair Provenance History with the downloaded .toda file (C8).
C8 Check a file's verdict and keep a copyVerify a file's integrity; download the .toda file
TODA files can be verified on their own. The Console shows a verdict and lets you download the file itself.
How
- Open the binder or the identity root (SDA) from Wallet → Inventory.
- Read the verification verdict at the top of the page.
- Click Download .toda File to keep a copy; notes have the same button.
What you’ll see
The identity root shows "Integrity certified by TODAQ Instant Relay"; the binder shows "Valid twin binder of record".
Watch for
- Note pages show an empty Verification Status box today; the binder and identity root show a verdict.
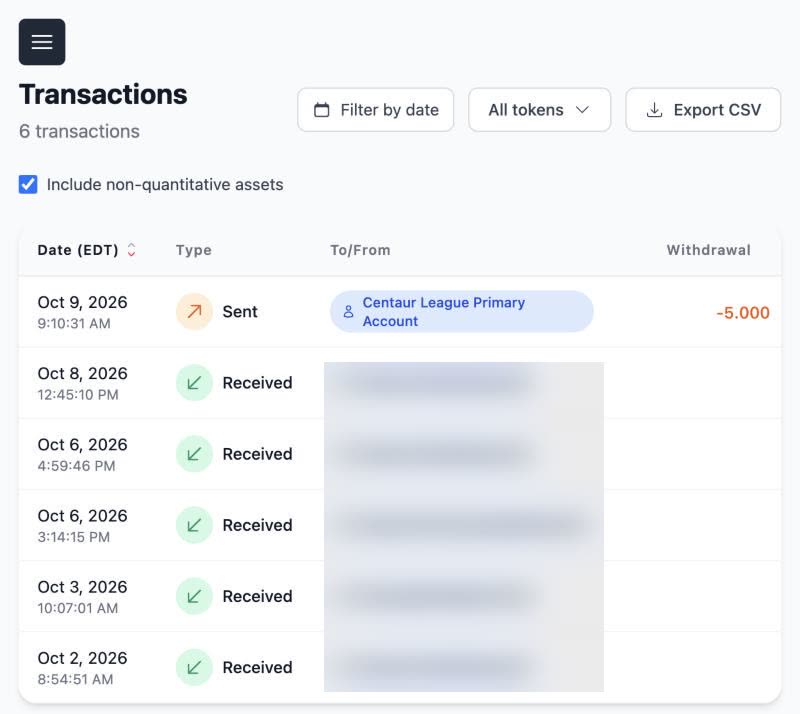
C9 Read and export a twin's ledgerRead transactions; filter, export CSV
Transactions is the twin's ledger, with a running balance. Export it for your books or to answer a buyer.
How
- Open the twin, then Wallet → Transactions.
- Filter by date and token; include non-quantitative assets if you need them.
- Read Type (Sent, Received, Microdistribution Income), To/From, Withdrawal, Deposit and Balance.
- Click Export CSV to save the list.
What you’ll see
A dated list with a running Balance column; Export CSV saves it as a file.
Watch for
- Microdistribution Income rows are revenue swept in from your catalog item twins.
- A cash-out shows as Sent to an unnamed twin, the bank gateway; match it by time and amount in Transfer History (C27).
Walk-through
C10 Open one transaction for the full detailOpen a transaction: transfer internals, notes, distribution id
A transaction's page holds its id and how it was made. Use it when a buyer or seller asks about one payment.
How
- In Wallet → Transactions, click a row's Details.
- Read status, counterparty, amount, entry type (Quantitative Transfer) and Transaction ID.
- For a send, open Transfer Internals: transfer id, duration, request id and the note-by-note table.
- For a revenue sweep, read the distribution rule id and the associated notes.
What you’ll see
The detail page shows the Transaction ID and, for sends, Transfer Internals.
Watch for
- "Balance after" in Transfer Internals can be wrong when sweeps arrive right after a send; trust the list's running Balance.
C11 Find a payout that seems stuckTrack outgoing transfers; find stuck ones
Transfer Activity lists every transfer the twin sent, with its status. It is the first place to look when a payout hasn't arrived.
How
- Open the twin, then Wallet → Transfer Activity.
- Filter All, In progress or Needs attention.
- Read Started, Recipient and memo, Amount, Status and Transfer ID.
What you’ll see
Each outgoing transfer shows a status: In progress, Completed, Needs attention or Not sent.
Watch for
- Check Needs attention first when a payout seems stuck.
C12 See which notes moved in a transferSee how a transfer was assembled (split, change, delivered)
USD-TDN move as whole notes, like cash. The detail page shows which notes went, which change stayed, and when each arrived.
How
- In Transfer Activity, click a transfer.
- Read To, Amount, Started, Completed, Memo and the linked transaction.
- Read the Notes table: each note is Split off, Change kept or Sent whole, with its delivery time.
What you’ll see
The Notes table shows exactly which notes moved and what change stayed behind.
Watch for
- Notes from one payment can arrive at different times, sometimes minutes apart.
C13 See who paid for each saleFind who paid for an item To confirm
Each catalog item has its own provider twin, where its payments land. Its Recent Activity names each payer.
How
- Find the item's provider twin: search Home by the item's name, or see Dashboard → Twins → Provider.
- Open the twin and read Recent Activity.
- Each payment shows the payer's email or twin, the amount and the time.
- In code: GET /v4/commodity/{hash}/transactions with the item's commodity hash (shown as Commodity ID; to confirm).
What you’ll see
Recent Activity lists each payment with the payer's email or twin.
Example
On Centaur League, a paid item's twin lists each team's entry payment by the payer's email.
Walk-through
C14 Pay one person, twin or refundSend USD-TDN to another twin Money
Send moves USD-TDN from a twin you control to another twin. Use it from the primary twin for a single payout or a refund.
How
- Open the twin you pay from (usually the primary) and click Send.
- Choose the Currency; its balance shows beside it.
- Enter the Amount, the Recipient Twin URL and an optional Memo for the recipient.
- Check from, to and amount, then click Transfer.
What you’ll see
The transfer appears in Wallet → Transfer Activity, then as Sent in Transactions.
Watch for
- Send needs the Transfer role; after a role change, sign out and in again.
- By API, a 202 means the money moved; never retry it.
- Send takes a twin URL today; paying by email is planned, as distributions already do.
C15 Buy USD-TDN from Treasury by wire or ACHRequest to buy USD-TDN from Treasury, then pay by wire or ACH Money
Purchase TDN sends a request to TODAQ Treasury. You pay by wire or ACH, and Treasury issues the USD-TDN to the twin.
How
- Email TODAQ at support@todaq.net that you want to buy USD-TDN; you receive the banking details.
- Send the funds by wire or ACH.
- Open the twin that should receive the USD-TDN, then Wallet → Purchase TDN → Buy TDN.
- Enter the Paid Amount in USD (1 USD buys 1 TDN), add a memo and click Submit Request.
What you’ll see
The request shows Pending; once Treasury sees your funds it sends the USD-TDN and closes the request as Complete.
Watch for
- This is a request: USD-TDN arrive only after Treasury receives your funds (S3).
Walk-through
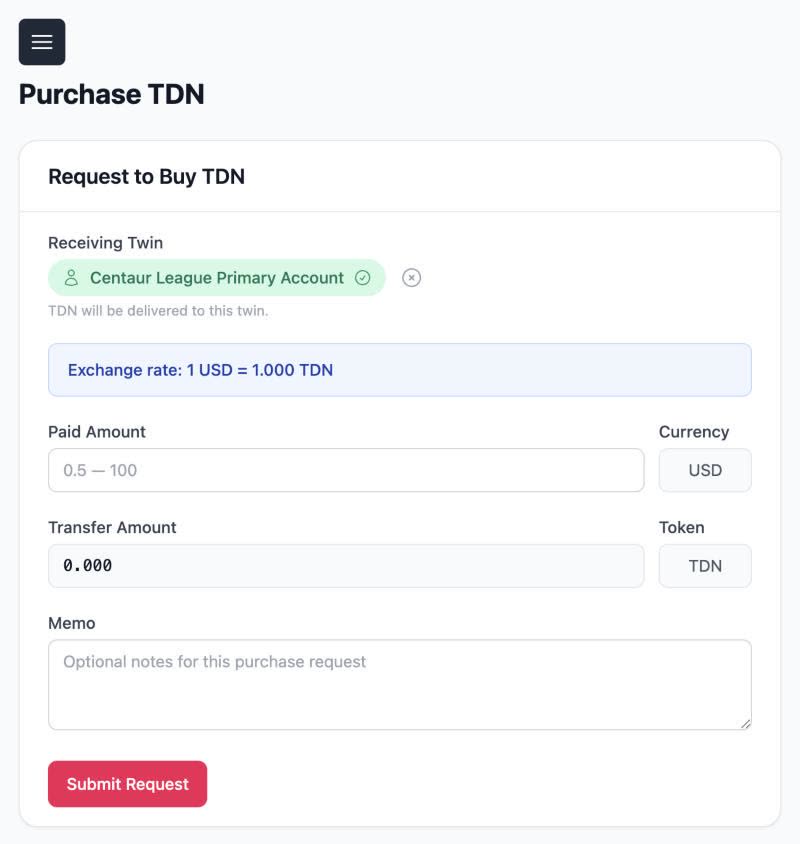
C16 Check whether your USD-TDN purchase is doneTrack USD-TDN purchase requests
Each purchase request has a status. Check it here before asking Treasury about a payment.
How
- Open the twin, then Wallet → Purchase TDN.
- Filter All, Pending, Complete or Cancelled.
- Read Date, Receiving Twin, Memo, Amount paid and Status.
What you’ll see
A request moves from Pending to Complete once Treasury issues the USD-TDN.
Watch for
- Treasury watches for your wire or ACH; when it arrives it sends the USD-TDN and closes the request.
C17 Sweep each item's revenue to your primarySet a standing distribution: item revenue to the primary twin
Payments land on each item's own twin, but payouts and cash-outs come from the primary. A standing distribution moves the money there for you.
How
- Open the catalog item's provider twin, then Configuration → Distributions → New.
- Choose the token TDN.
- Add one recipient, the primary twin URL or the account email, at 100%.
- Set Minimum Value (1 is the standard), tick Enabled, then click Save Distribution.
What you’ll see
The Standing tab shows the rule, and the primary twin starts showing Microdistribution Income rows.
Watch for
- Runs happen a few times a day; tell customers to expect funds within a day.
- One standing distribution per token per twin; choosing TDN again opens the existing rule's Edit form.
- Once a distribution is active, the twin's Send button is replaced by it.
- If funds are late, check the item twin's Activity tab, then email support@todaq.net.
Example
Centaur League's Create a Chess Challenge twin sends 100% to the league's primary account, minimum 1.
Walk-through
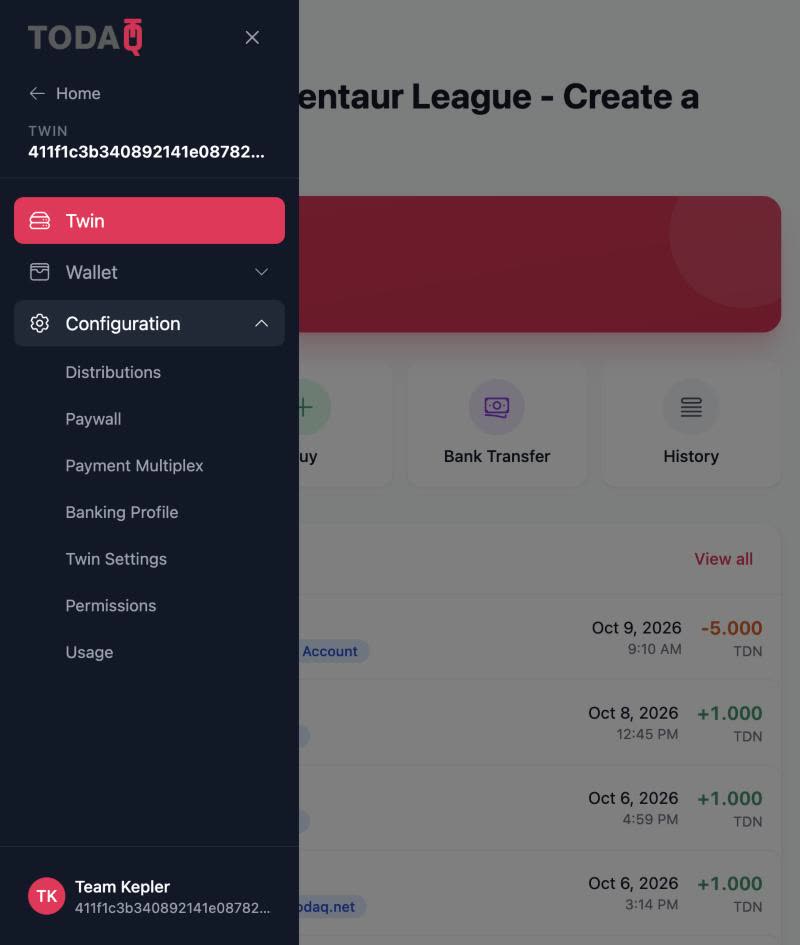
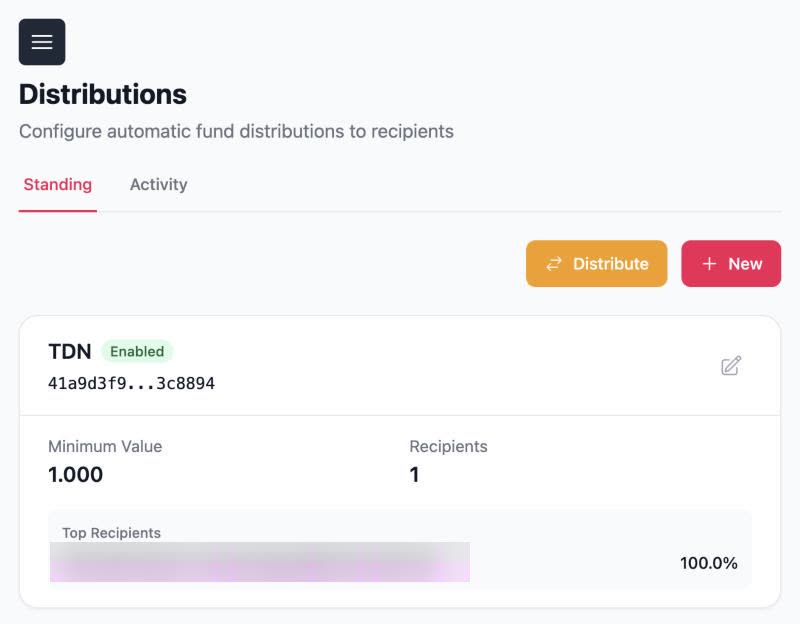
C18 Split revenue or pay many people at onceSplit revenue, or pay up to 200 payees by twin or email (CSV import)
A distribution can pay several recipients by percentage. Use it for royalties, partner shares or many prize winners.
How
- Open the distribution and click Edit (or New on a fresh twin).
- Add recipients by twin URL or Email, each with a Percentage; the total must be 100%.
- For many payees, click Import CSV; Export CSV saves the current list.
- Check recipients and percentages, then click Save Distribution.
What you’ll see
The edit form shows the percentage total, and the saved rule lists its recipients.
Watch for
- Up to 200 payees per distribution.
- A payee added by email needs a twin to receive funds today; email sign-in to the Console for twin holders is coming.
C19 Pay out a distribution right awayRun a distribution now Money
Distribute Now runs a distribution without waiting for its next run. Use it when a payout is due today.
How
- Open Configuration → Distributions and view the rule.
- Check the twin's balance, the recipients and their percentages.
- Click Distribute Now.
- Open the Activity tab to see the run complete.
What you’ll see
A new run appears in Activity with its value, status, and start and finish times.
Watch for
- A run can complete while the receiver sees it arrive as two deposits minutes apart; check the run page (C20) before reporting a shortfall.
- The owner clicks Distribute Now; an agent never does.
Example
Centaur League's first run moved 5 USD-TDN from a paid item twin to the primary.
Walk-through
C20 Check every payee in a distribution runCheck distribution runs and the transfer for each payee
Each run has a page listing every payee and the transfer that paid them. Use it to answer "did I get paid?".
How
- Open Configuration → Distributions → Activity.
- Read each run's ID, Value, Status, Recipients, Started and Completed.
- Click a run to see each recipient's value, status and transfer id.
- Click a transfer id to open it in Transfer Activity.
What you’ll see
The run page lists every payee with a status, for example COMPLETED, and a transfer link.
Walk-through
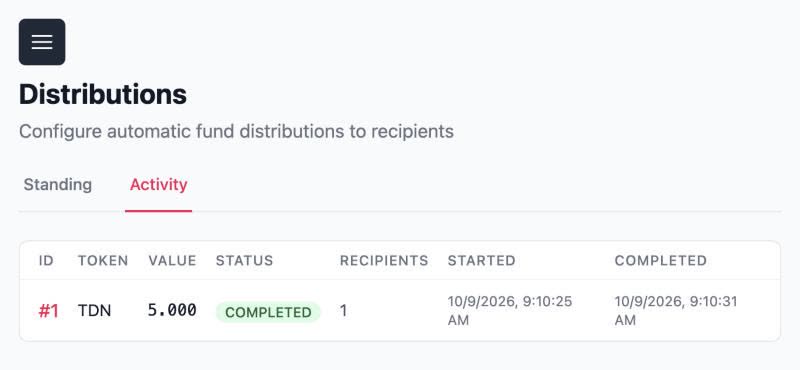
C21 Charge per call for a serviceConfigure a twin paywall (target, price, token)
A twin paywall charges per call for an https service the twin fronts. Every Qatom catalog item already works this way through its provider twin.
How
- Open the twin, then Configuration → Paywall.
- Tick Enabled and enter the Target URL (https).
- Choose the Payment Token (Use TDN) and the Payment Amount, up to three decimals.
- Click Save Configuration.
What you’ll see
The paywall saves as Enabled; callers pay through the twin's paywall URL.
Watch for
- Give each paywalled product its own twin, with a standing distribution to the primary.
- A primary twin should not be a live paywall; if one shows Enabled with a placeholder target, report it.
- A catalog item's twin forwards to Qatom; never share its Target URL.
Walk-through
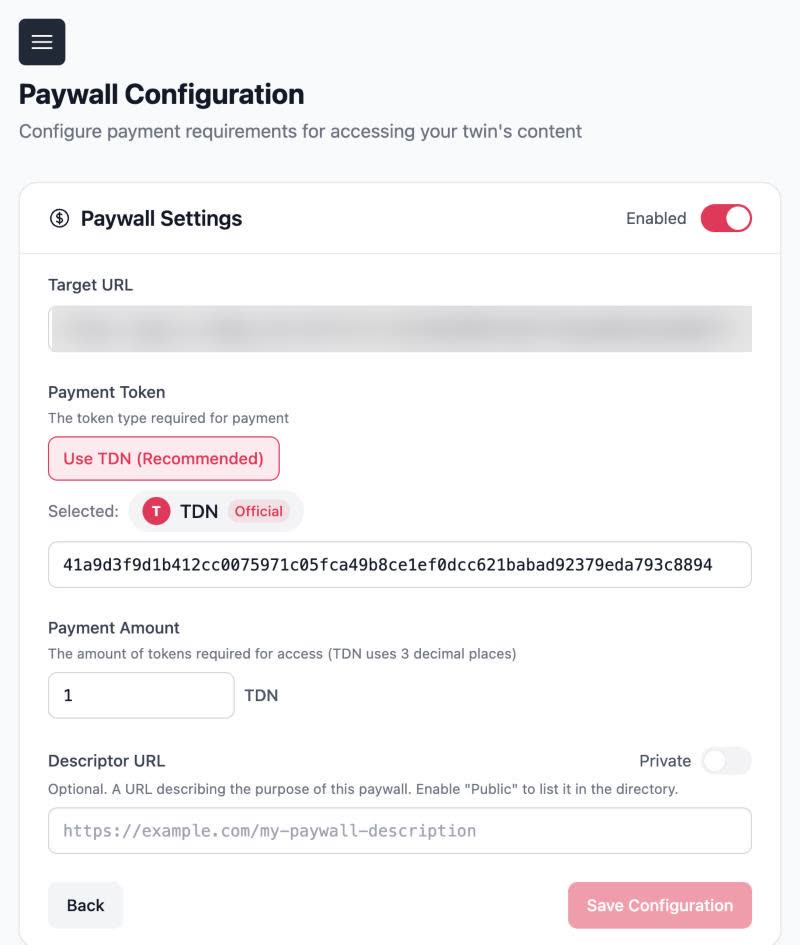
C22 List your paywall where others can find itPublish a paywall to the Directory; browse the Directory
A public paywall appears in the Directory of paywalls on the network. Its descriptor page tells callers what it does.
How
- In Configuration → Paywall, enter a Descriptor URL that explains the service.
- Switch the toggle to Public and click Save Configuration.
- Open the menu → Directory and search by account.
- Click Details on an entry to open its descriptor.
What you’ll see
Your paywall appears in the Directory under "Public paywalls available on the network".
Watch for
- Link a real descriptor page, not a placeholder; the Directory shows whatever you link.
C23 Spread high-volume buying across payer twinsAdd payer twins to Payment Multiplex (each payer's API key is on Dashboard → Twins) SecretTo confirm
Payment Multiplex lets a master twin hand each purchase to the next free payer twin. Buyers deal with one endpoint and one budget.
How
- Open the master twin, then Configuration → Payment Multiplex → Payers.
- In the Qatom Dashboard, open Twins → the payer twin and copy its API key.
- Back in the Console, paste the payer's Twin URL and API key, then click Add.
- Repeat for each payer; plan about one payer per purchase running at the same time.
What you’ll see
Each added payer twin belongs to the master's multiplex (to confirm what the Payers list shows).
Watch for
- Payers must belong to the same account or group.
- The owner pastes API keys; an agent never handles them.
- To confirm What the Payers list shows after a payer is added.
C24 Keep payer twins funded automaticallySet multiplex top-ups (threshold, amount) MoneyTo confirm
Top-ups refill any payer twin that falls below a threshold, from the master twin's balance. You pre-fund only the master.
How
- On the master twin, open Payment Multiplex → Top-ups and start a new top-up.
- Pick the Token; the master's balance shows beside it.
- Set Threshold and Top-up amount, tick Enabled, then Save.
What you’ll see
The top-up rule is saved on the master twin (to confirm how it is listed).
Watch for
- Top-ups run daily and come out of the master twin; pre-fund it with the total budget.
- Set the threshold at or above a payer's expected spend per day.
- To confirm How a saved top-up and each top-up run are shown.
C25 Add the bank account you cash out toCreate the banking profile (USA or Canada) Secret
A banking profile holds the direct-deposit details for one twin. You need it before you can cash out.
How
- Open the twin you cash out from, then Configuration → Banking Profile.
- Enter Account Holder Name, Financial Institution Name, Country (USA or Canada) and Account Type (Chequing or Savings).
- USA: street address, city, state, ZIP, 9-digit routing number and account number. Canada: transit (5–6 digits), institution (3 digits) and account number.
- Click Create Profile.
What you’ll see
Bank Transfer then shows the destination account masked, with only its last four digits.
Watch for
- The account owner types bank details; an agent never does.
- Profiles are per twin; set one on the twin you will cash out from.
C26 Cash out USD-TDN to your bankCash out to the bank (at least 10 USD-TDN, $1 fee, ACH 2–5 days) Money
Bank Transfer sells USD-TDN to TODAQ Treasury, which pays US dollars to your bank by ACH. It needs a banking profile and at least 10 USD-TDN.
How
- First sweep item revenue to the twin you cash out from, usually the primary (C17).
- Open the twin and click Bank Transfer, then Bank Transfer again.
- Enter the Amount (minimum 10) and read the Transfer Summary: fee and what you will receive.
- Check the masked Destination Account and the Amount once more.
- Click Continue.
What you’ll see
Transfer History shows the request as Pending, and the USD-TDN leave the twin at once.
Watch for
- Continue submits immediately; there is no review screen, and the Amount can keep an earlier value.
- A flat 1 USD fee applies; ACH takes 2–5 business days.
- A submitted cash-out can't be cancelled yet; check the amount before Continue. If one went out wrong, email support@todaq.net.
Walk-through
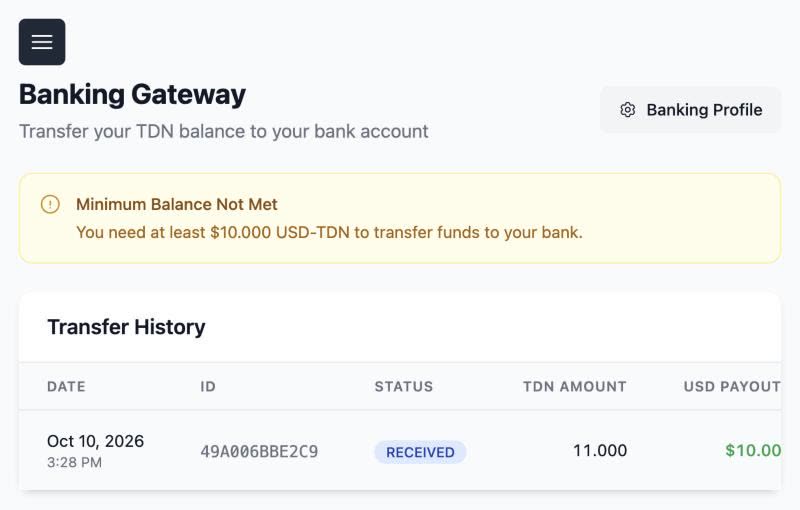
C27 Follow a cash-out until it is paidTrack a cash-out
Each cash-out has a request with a status. Check it before chasing a deposit.
How
- Open the twin, click Bank Transfer, then Transfer History.
- Click a request to see Status, TDN Amount, Expected Payout, Created, Last Updated and Request ID.
What you’ll see
The detail page says funds will be deposited within 2–5 business days.
Watch for
- The list can say PENDING while the detail page says Processing for the same request.
- Questions about a cash-out: email support@todaq.net.
Walk-through
C28 Rename a twin and set its emailEdit the twin's persona: display name and email
The persona is the twin's public face: the name shown everywhere and an email others can pay.
How
- Open the twin, then Configuration → Twin Settings.
- Read Twin URL, TODA Address, Binder ID and Managing Organization.
- Under Persona, edit Display Name and Email.
- Click Save Changes.
What you’ll see
The new Display Name shows as the twin's name in the Console.
Watch for
- The persona email is payable: distributions and transfers can send to it.
C29 Check who can see or move a twin's fundsSee who has access to a twin To confirm
Access is granted twin by twin. This page is meant to show who holds which role.
How
- Open the twin, then Configuration → Permissions.
- Read who holds Admin, Transfer or Read-only on the twin.
What you’ll see
To confirm A list of people and their role on the twin.
Watch for
- Today this page returns 403 even for twin Admins; ask the account owner who has access.
- Roles: Admin configures, Transfer can send, Read-only can only look.
C30 Check a twin's usageRead usage (files, transactions, storage)
Usage shows how much a twin holds and has done against a standard allocation. It helps when you look into a busy twin.
How
- Open the twin, then Configuration → Usage.
- Read files, transactions and storage against the standard allocation (25 files, 1,250 transactions, 100 MB).
- Read the Inbox, Rejected and Unowned counts.
What you’ll see
An Overall figure shows usage as a multiple of the standard allocation, for example 0.3x.
Watch for
- These are internal health metrics; no customer limits apply today.
- Unowned counts the last proof of each file the twin held before it moved to a new bearer.
C32 Sign in again to apply a new roleSign out, and sign in again after a role change
A role change takes effect only at your next sign-in. Sign out and back in after an owner changes your access.
How
- Open the user menu and click Sign out.
- Sign in again (C1).
What you’ll see
Controls now match your new role; for example, Send is enabled after you get the Transfer role.
Watch for
- The Console doesn't tell you a role changed; sign out and in when an owner says so.
- Before you sign in again, some twins may show without names or balances.
C33 See what changed in the ConsoleRead what is new
The Console changes often. Release Notes lists each version and what it added.
How
- Open the menu and click Release Notes.
- Read each version's date and changes.
What you’ll see
A list of Console versions with dates, for example v2.6.0 (28 Sep 2026) adding Transfer Activity.
Watch for
- If a screen differs from this guide, trust the screen.
No steps match. Try a shorter search, or clear the filters.
Ready when you are
Try it in your own AI chat.
Connect Qatom to Claude, Grok, Muse or any MCP client and follow step A1, or open the Qatom Dashboard and start selling with B1.